Acrylic nails give 4th of July nail art the best possible canvas. The length, the shape, and the smooth, hard surface of a quality acrylic set allows nail art to be applied more precisely, more beautifully, and more durably than on a natural nail. The results last longer. The designs look more professional. And the finished photographs are genuinely extraordinary. These 21 simple acrylic 4th of July nails ideas were chosen because every single one of them is achievable without advanced nail art training. Simple here means straightforward technique rather than basic results. Every design on this list looks genuinely stunning. Every one wears the patriotic palette in a way that is contemporary and beautiful rather than obvious and overdone. And every single one of them will make every guest at the 4th of July party look down at the hands holding their drink and immediately ask who did those.
The Nail Ideas
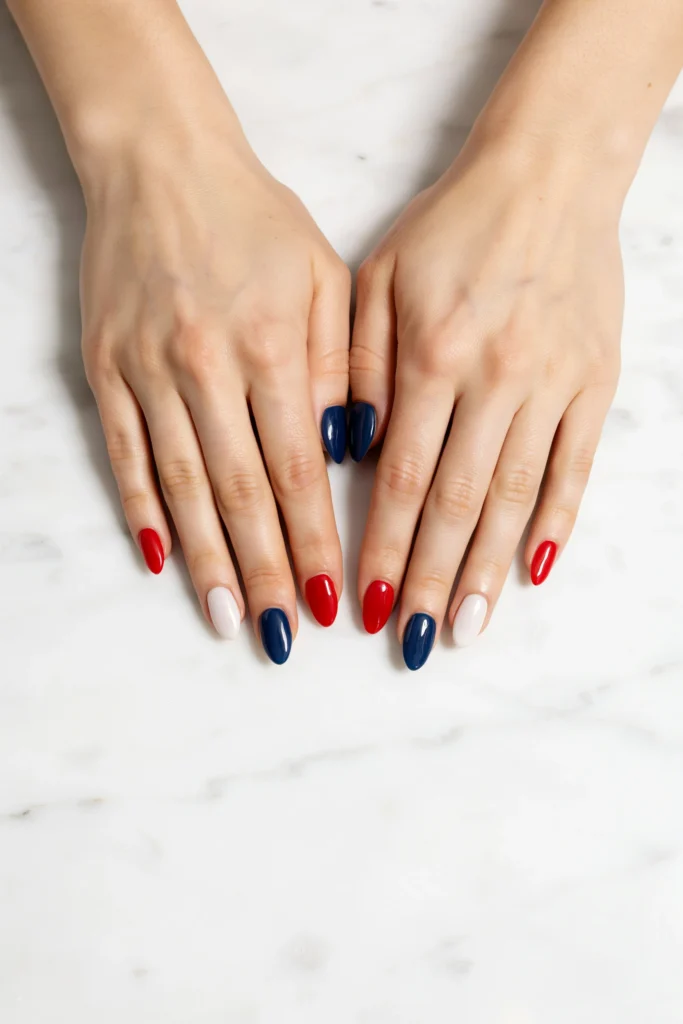
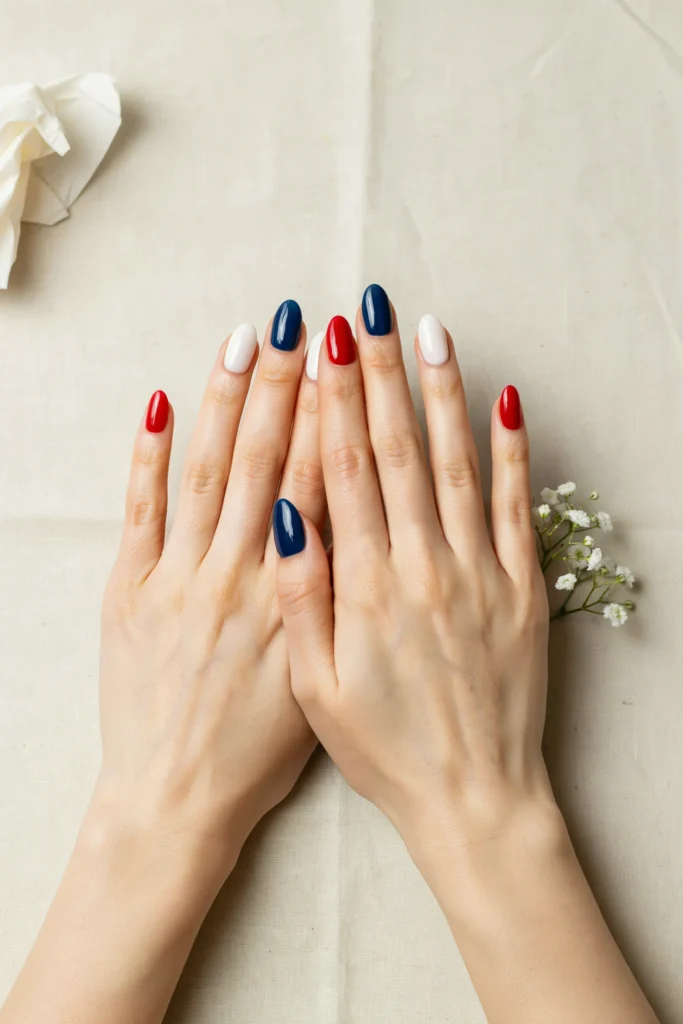
1. Red White and Blue Almond Acrylic Set
A classic almond-shaped acrylic set with nails painted in a rotating solid sequence of red, white, and navy blue is the most straightforward and the most universally flattering simple patriotic acrylic nail look available. The almond shape is elegantly feminine. The rotating solid colors create a clean, graphic patriotic set without any nail art required.
How to Do It: Apply acrylic extensions in the almond shape to all ten nails. File and buff each nail to a perfectly smooth surface. Apply a base coat. Paint nails in a rotating patriotic sequence. Two red nails, two white nails, two navy nails repeating across the set. Apply two coats of each color for full, even coverage. Seal with a glossy gel top coat or a regular top coat. For the longest wear apply a thin layer of top coat over the tips of all nails specifically.
Styling Tip: Choose nail polish shades that are the correct temperature for your skin tone. A warm tomato red and a warm navy rather than a cold, blue-toned red and a cool grey-navy. Warm-toned polish shades look vibrant and intentional on most skin tones while cool-toned shades can appear dull or harsh depending on the complexion.
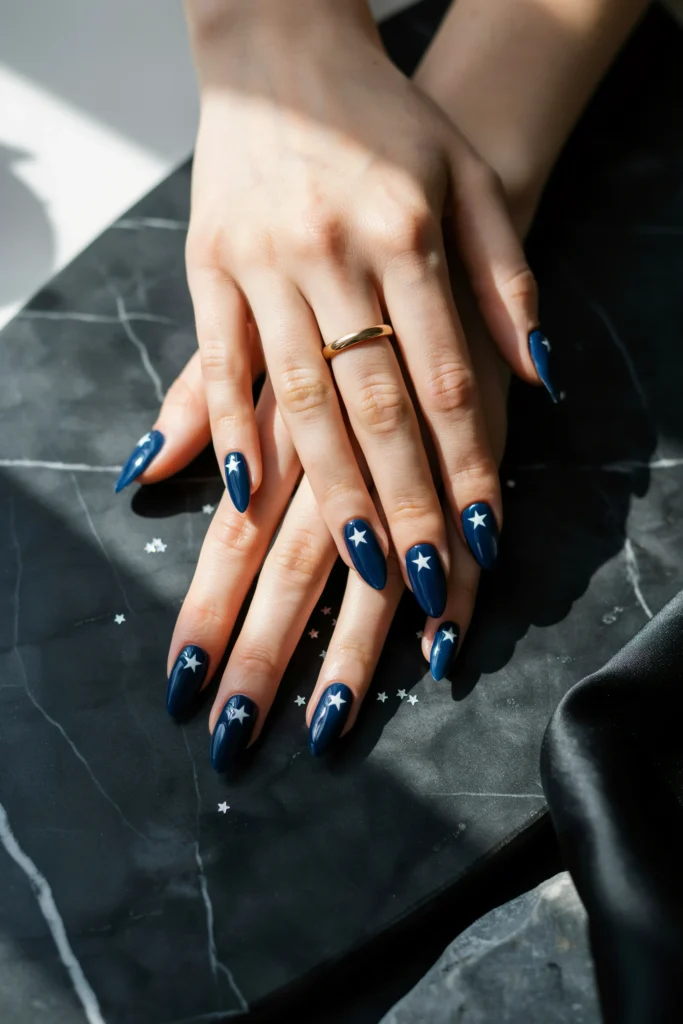
2. Patriotic Coffin Nails with Star Detail
Medium-length coffin acrylics in a solid navy blue base with a single hand-painted or stamped white star at the center of each nail create a complete, cohesive, and genuinely striking patriotic acrylic set that is beautiful in its simplicity and its consistency.
How to Do It: Apply acrylic extensions in the coffin shape at a medium length. Buff all surfaces smooth. Apply two coats of deep navy blue gel polish or regular nail polish to all ten nails. Allow to cure or dry completely. Using a fine detail brush loaded with white nail art paint or a star-shaped nail stamp with white stamping polish, apply a single star at the center of every nail. Keep the star size and placement consistent across all ten nails. Seal with a glossy top coat.
Styling Tip: Apply the star to each nail before the final top coat rather than after so the star detail is sealed beneath the top coat and protected from chipping and lifting. A star detail sitting on top of the final top coat will chip within hours of normal hand use. One sealed beneath the top coat remains intact for the full wear period of the acrylic set.
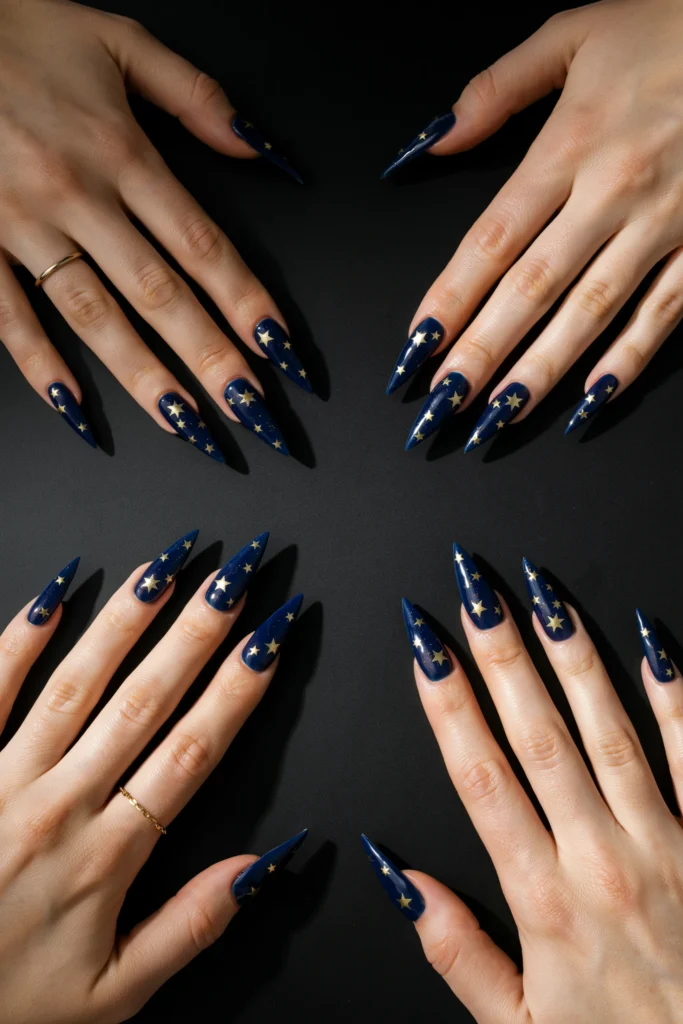
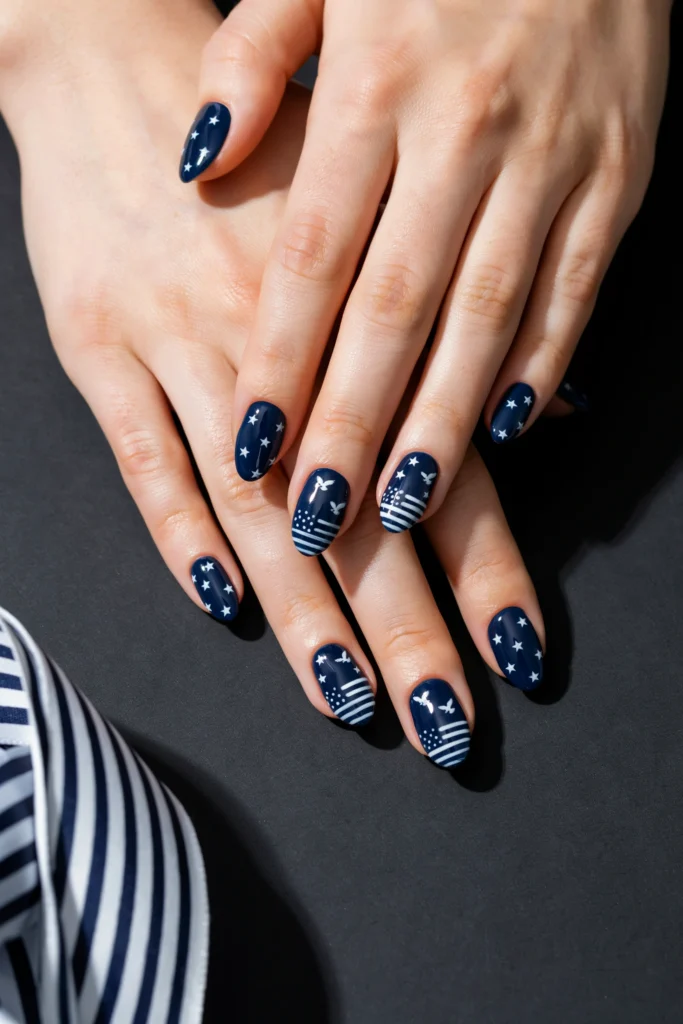
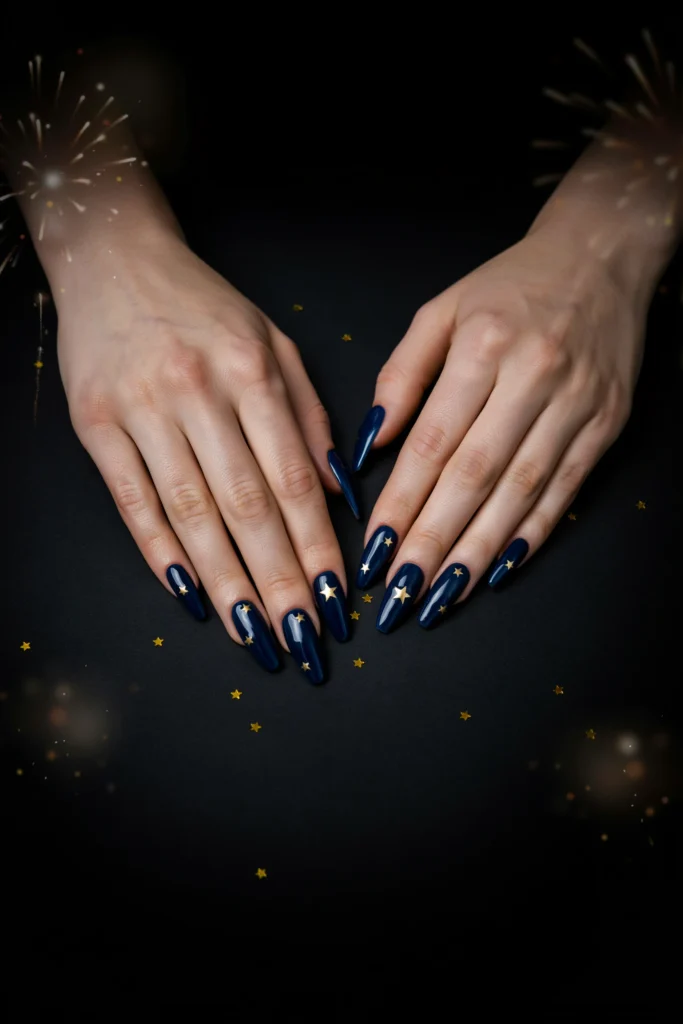
3. Simple Navy Stiletto Nails with Gold Stars
Long navy blue stiletto acrylics with scattered gold star details applied across the surface of each nail create one of the most dramatic and the most glamorous simple patriotic acrylic sets on this list. The stiletto shape is bold and confident. The navy and gold combination is simultaneously patriotic and genuinely luxurious.
How to Do It: Apply acrylic extensions in a long stiletto shape. File each nail to a sharp, symmetrical stiletto point. Apply two coats of deep navy gel polish to all nails. Allow to cure completely. Using a fine detail brush loaded with gold nail art paint or a gold nail art pen, apply scattered stars of varying sizes across the surface of every nail. Include one or two larger stars and three to four smaller stars per nail. Apply a gold glitter top coat or a glossy clear top coat over the completed design.
Styling Tip: Vary the star sizes deliberately across every nail. A combination of large statement stars and smaller satellite stars creates the visual dynamic of a genuine night sky rather than a uniform, mechanical pattern of same-sized stars. The size variation is free to achieve and produces a significantly more beautiful result.
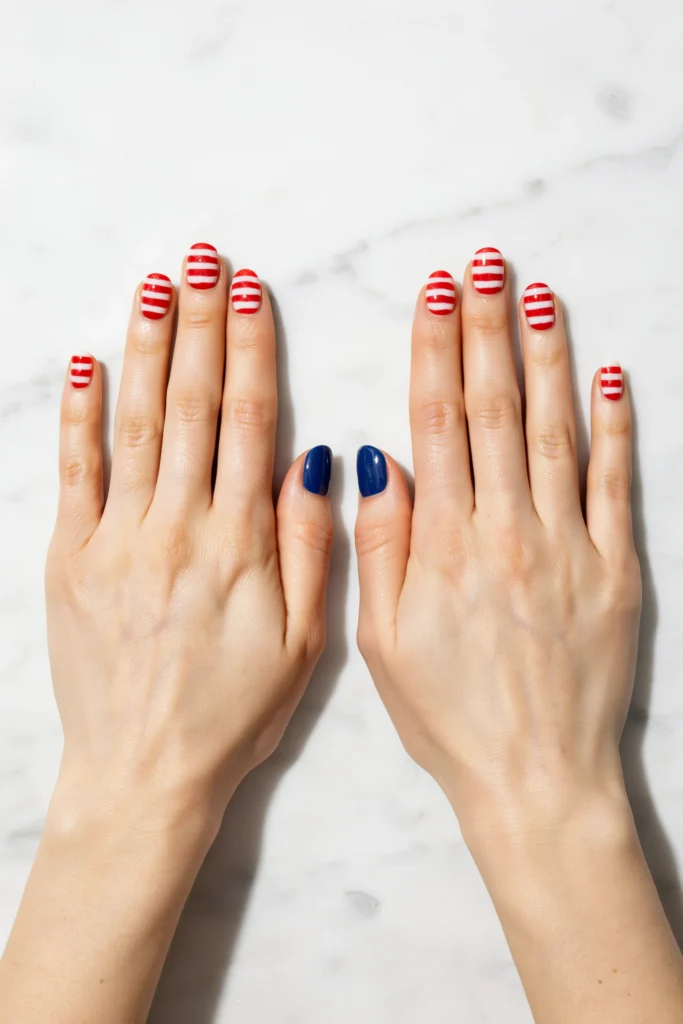
4. Red and White Stripe Square Acrylics
Short-to-medium square acrylic nails with clean red and white horizontal stripes and a single navy blue accent nail on each ring finger create the most directly flag-inspired and the most graphic simple patriotic acrylic set available.
How to Do It: Apply acrylic extensions in a short-to-medium square shape. Buff all surfaces completely smooth. Apply a white base coat to all nails. Use thin nail art tape laid in horizontal lines across each nail at even intervals leaving alternating gaps. Paint over the full nail with red polish. Remove tape while slightly wet to reveal clean white stripe lines. Apply the same stripe design to all nails except the ring finger. On the ring fingernail apply two coats of navy blue instead. Seal all nails with a glossy top coat.
Styling Tip: Keep the stripe width consistent across every striped nail in the set. Measure the tape placement on the first nail and use that as the template for every subsequent nail. Consistent stripe width across all eight striped nails communicates a professionally designed pattern. Inconsistent stripe widths communicate a freehand approximation and the difference is immediately apparent when all ten nails are viewed together.
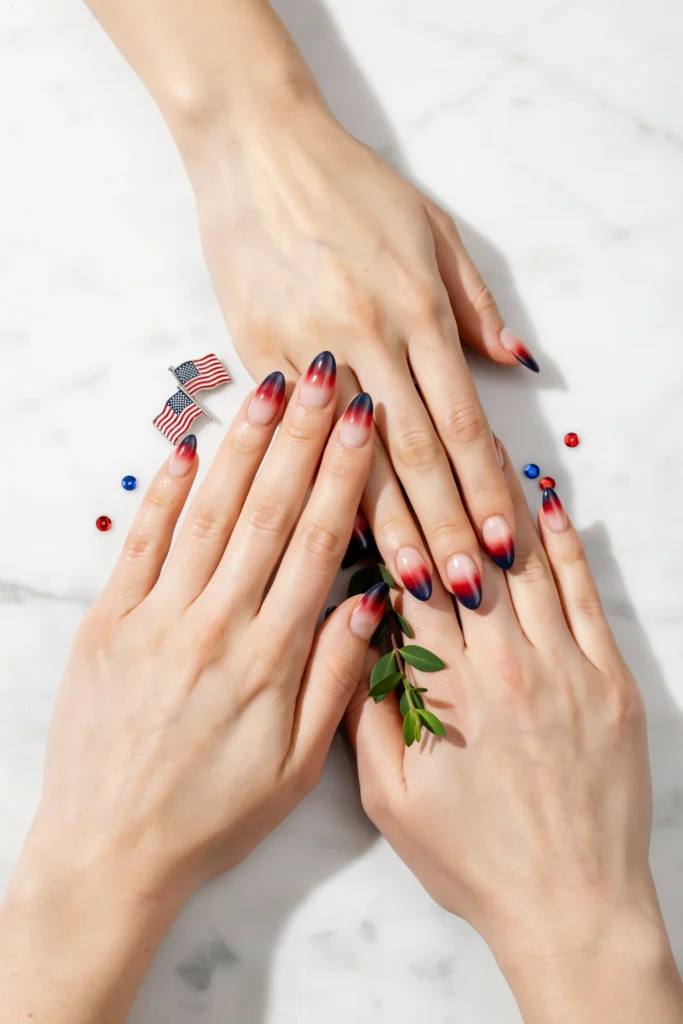
5. Patriotic Ombre Almond Nails
A smooth red to white to blue ombre gradient across each almond-shaped acrylic nail creates one of the most visually beautiful and the most instantly patriotic simple acrylic nail designs available. The gradient effect photographs with extraordinary vibrancy and suits the almond shape perfectly.
How to Do It: Apply acrylic extensions in the almond shape. Apply a white gel or regular base coat to all nails. On a small palette apply red, white, and blue polish stripes side by side. Load a small makeup sponge with all three colors simultaneously. Dab the loaded sponge onto each nail firmly two to three times building the ombre gradient from deep red at the base through white at the center to deep navy at the tip. Clean the skin around each nail with acetone. Cure under UV lamp if using gel products or allow to fully air dry. Apply a glossy top coat.
Styling Tip: Position the white section of the ombre gradient at the true center of each nail and ensure the red section at the base and the navy section at the tip are equal in width so the ombre reads as a balanced, symmetrical three-color gradient rather than a gradient where one color dominates and the others are squeezed into narrow sections at each end.
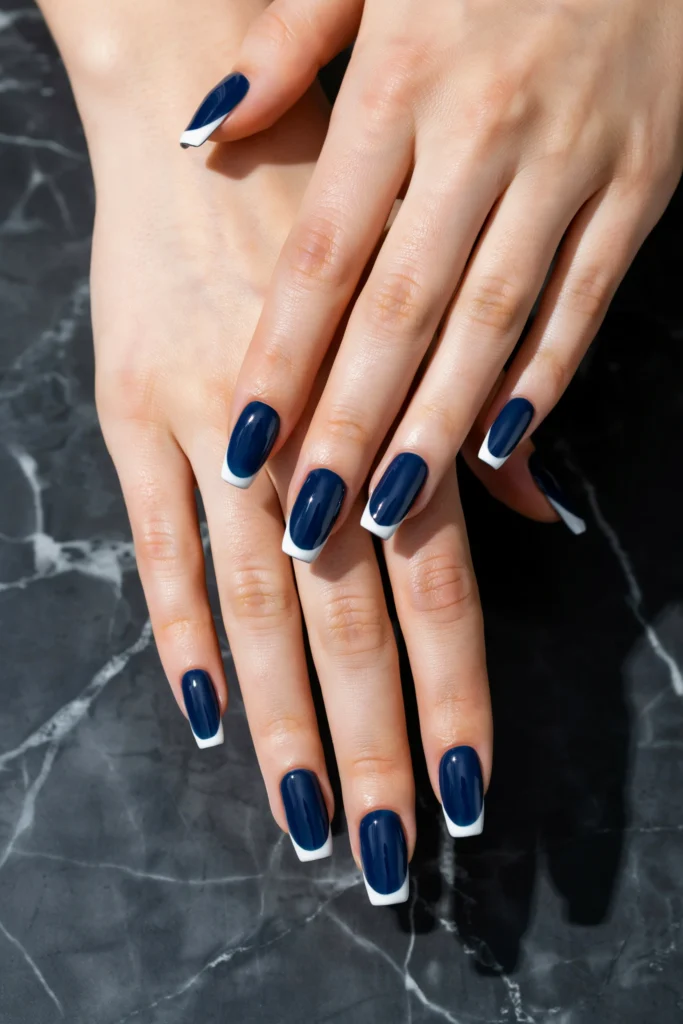
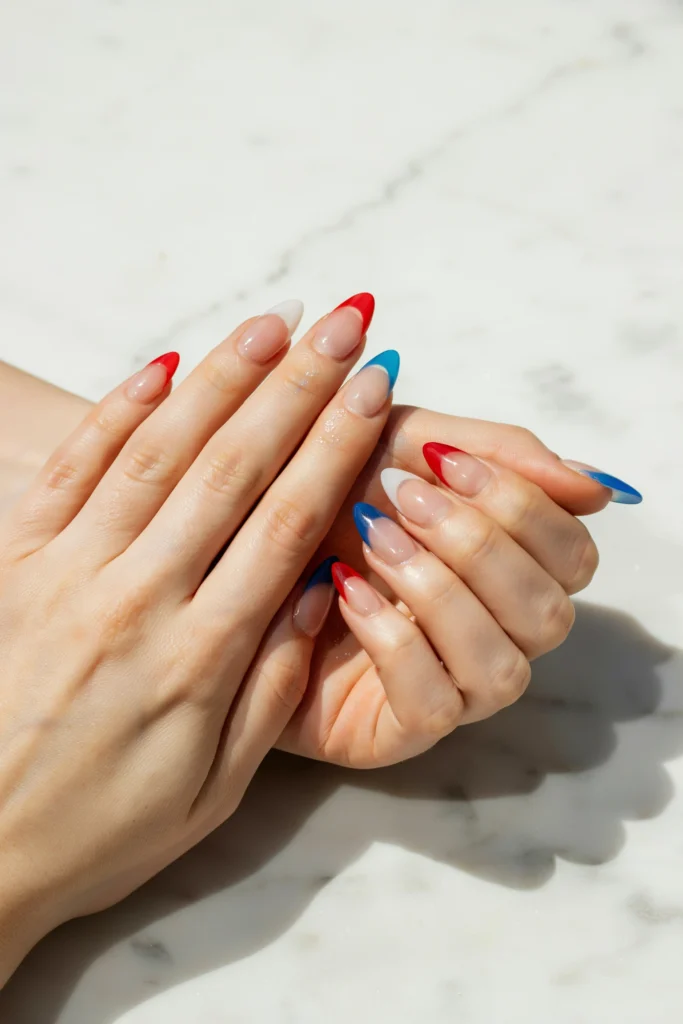
6. Navy Coffin Nails with White French Tip
Navy blue coffin acrylics with a white French tip applied at the squared coffin tip creates an unexpected and genuinely elegant variation on the classic French manicure that is simultaneously patriotic, sophisticated, and completely unique.
How to Do It: Apply acrylic extensions in the coffin shape. Buff all surfaces smooth. Apply two coats of deep navy blue gel polish or regular nail polish to all nails. Allow to cure or dry completely. Apply white gel polish or regular white polish across the flat coffin tip of every nail in a clean, even band. The width of the white tip should be approximately three to four millimeters for the most proportionally balanced result. Use a thin nail art brush for the cleanest tip application. Cure or dry completely. Apply a glossy top coat.
Styling Tip: Apply the white tip with a single, confident brushstroke across the full width of the coffin tip rather than building it from multiple small strokes. A single confident stroke produces a clean, even white tip. Multiple small strokes produce an uneven, slightly streaky tip where the brush overlap marks are visible in the finished result.
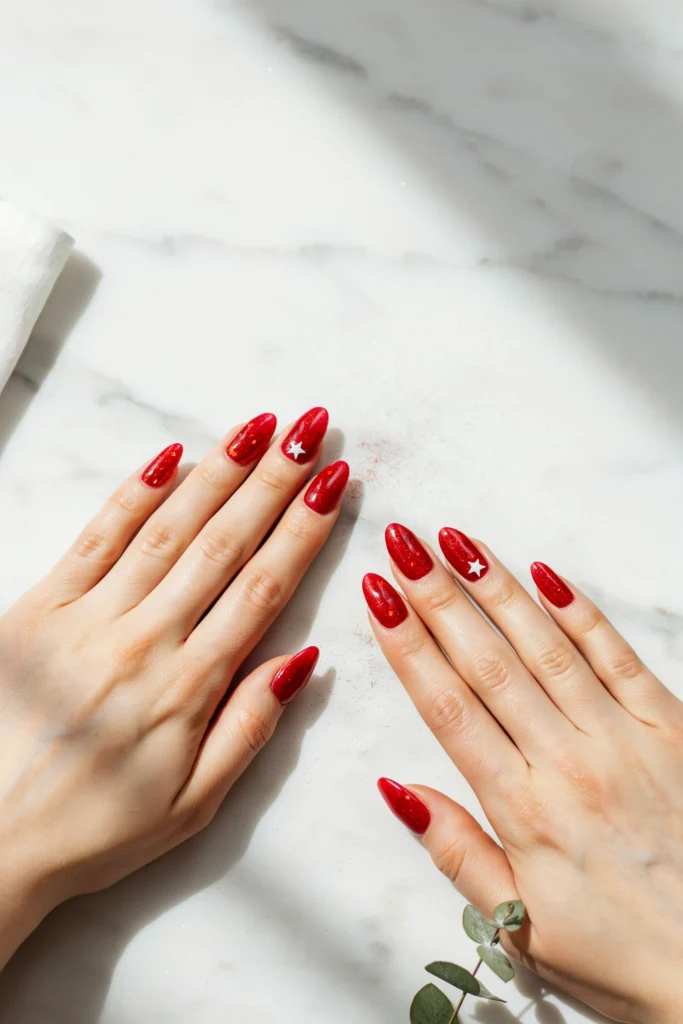
7. Simple Red Glitter Acrylic Set
A full set of red glitter acrylic nails in a consistent shape is the boldest and the most glamorously simple patriotic acrylic nail option on this list. Red glitter on acrylic catches light from every angle and photographs with extraordinary vibrancy throughout any celebration.
How to Do It: Apply acrylic extensions in the preferred shape, almond, coffin, or square all work beautifully. Apply a red glitter gel polish or a combination of red gel base and red fine glitter gel over the top to all ten nails. Build the glitter coverage through two coats ensuring the glitter is dense and consistent with no thin or bald patches visible on any nail surface. Seal with a gel top coat cured under a UV lamp for the smoothest possible glitter surface finish. Apply a second top coat layer specifically to the nail tips for maximum durability.
Styling Tip: Add a single white star sticker to the ring fingernail of each hand as the only additional nail art detail in the full red glitter set. One star accent on two nails among ten identical red glitter nails gives the set a focal point and a patriotic detail without disrupting the dramatic, cohesive impact of the all-glitter set.
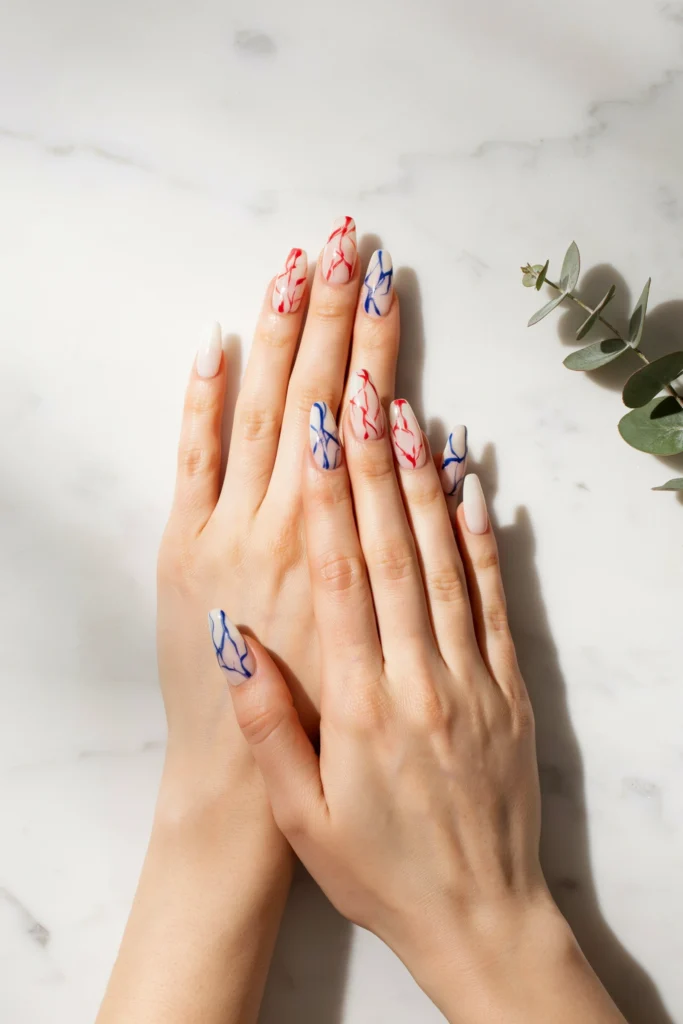
8. Patriotic Marble Coffin Nails
Red, white, and blue marble coffin acrylics alternate across the full set creating a luxurious, editorial patriotic nail look that is simultaneously sophisticated and festive. Each marble nail tells the same story in a different color.
How to Do It: Apply acrylic extensions in the coffin shape. Apply a white base coat to all nails. Thin a small amount of red nail art paint slightly for free-flowing veining lines. Using a fine liner brush draw irregular, branching veining lines across three nails on each hand for the red marble nails. Repeat with navy blue thinned paint on two other nails for the blue marble nails. Leave one nail plain white on each hand. Apply a glossy top coat over the full set.
Styling Tip: Draw veining lines with a fully extended, relaxed wrist motion rather than a tight, controlled grip on the brush because relaxed wrist drawing produces the organic, natural curves of genuine marble veining while a tight grip produces straight, mechanical lines that look like they were drawn rather than like they grew naturally within the stone. Relax the hand completely before every single vein stroke.
9. Red White and Blue Ballerina Nails
Ballerina-shaped acrylics in a rotating solid patriotic color sequence create a clean, modern, and flattering nail set that suits a wide range of hand shapes and is one of the most popular acrylic shapes in current nail fashion.
How to Do It: Apply acrylic extensions in the ballerina shape. File all nails to a consistent ballerina shape with a squared, flat tip and tapered sides. Apply a base coat to all nails. Paint in a rotating solid patriotic sequence. Three nails in red, three in white, and four in navy alternating across both hands. Apply two coats of each color for full coverage. Add a single subtle detail to the accent nails if desired. A small star on the ring finger or a thin French tip in white on the navy nails. Seal with a glossy top coat.
Styling Tip: Keep the flat tip of each ballerina nail at a consistent width across all ten nails throughout the filing process. Ballerina nails where the flat tips vary in width between fingers look uneven and unpolished. Consistent flat tip widths communicate a professional, considered finish that makes the clean solid color polish look significantly more intentional and significantly more beautiful.
10. Simple Stars and Stripes Coffin Set
A coffin acrylic set where half the nails feature painted stripes and the other half feature painted stars creates a complete, coherent stars and stripes patriotic nail set that is genuinely beautiful and genuinely easy to execute.
How to Do It: Apply acrylic extensions in the coffin shape. Apply a white base coat to all nails. On the thumb, middle finger, and pinky nails on each hand use thin nail art tape to create horizontal stripes. Paint the exposed sections red and remove the tape while wet to reveal clean white stripe lines. On the index and ring finger nails on each hand apply a navy blue base coat. Once dry apply scattered white star dots using a dotting tool or a toothpick dipped in white nail art paint. Seal all nails with a glossy top coat.
Styling Tip: Balance the number of stripe nails and star nails evenly across both hands so the full set reads as a unified stars and stripes design rather than a set where one design type dominates. Three stripe nails and two star nails per hand creates the most balanced and the most visually cohesive division of the full patriotic design across the complete ten-nail set.

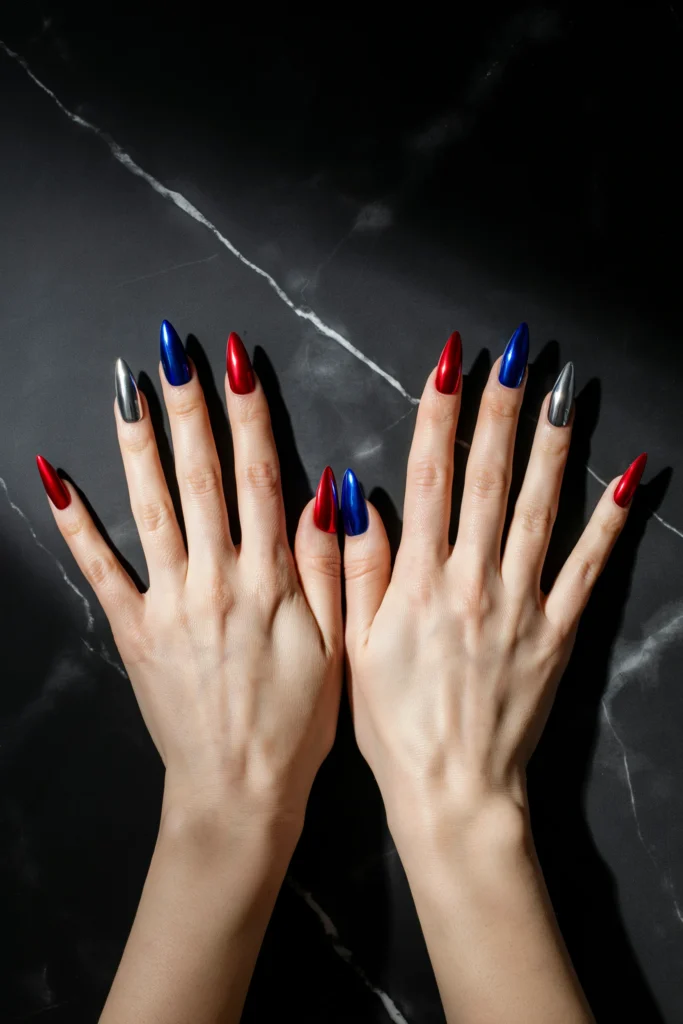
11. Patriotic Chrome Stiletto Nails
Chrome acrylic stiletto nails in alternating red chrome, white chrome, and blue chrome create the most futuristic and the most genuinely spectacular mirror-finish patriotic acrylic nail set on this list. Chrome nails photograph with an extraordinary reflective quality that makes every photograph taken at the party genuinely extraordinary.
How to Do It: Apply acrylic extensions in the stiletto shape. Apply a gel base coat and cure. Apply a gel top coat to all nails and cure until completely tacky-free. Using a chrome powder applicator sponge rub the appropriate chrome powder color firmly onto each nail surface in small circular motions until a full mirror-like chrome finish appears. Apply red chrome to three nails per hand, white or silver chrome to three nails per hand, and blue chrome to four nails per hand. Seal with a gel top coat applied carefully and cured to lock the chrome finish permanently.
Styling Tip: Apply the chrome powder only to a no-wipe gel top coat that has been cured completely under a UV lamp because chrome powder produces its mirror-like finish only when rubbed onto a smooth, cured gel surface. Applied over any other surface the same chrome powder produces a dull, patchy, non-reflective result that bears no resemblance to the mirror finish that makes chrome nails so visually extraordinary.
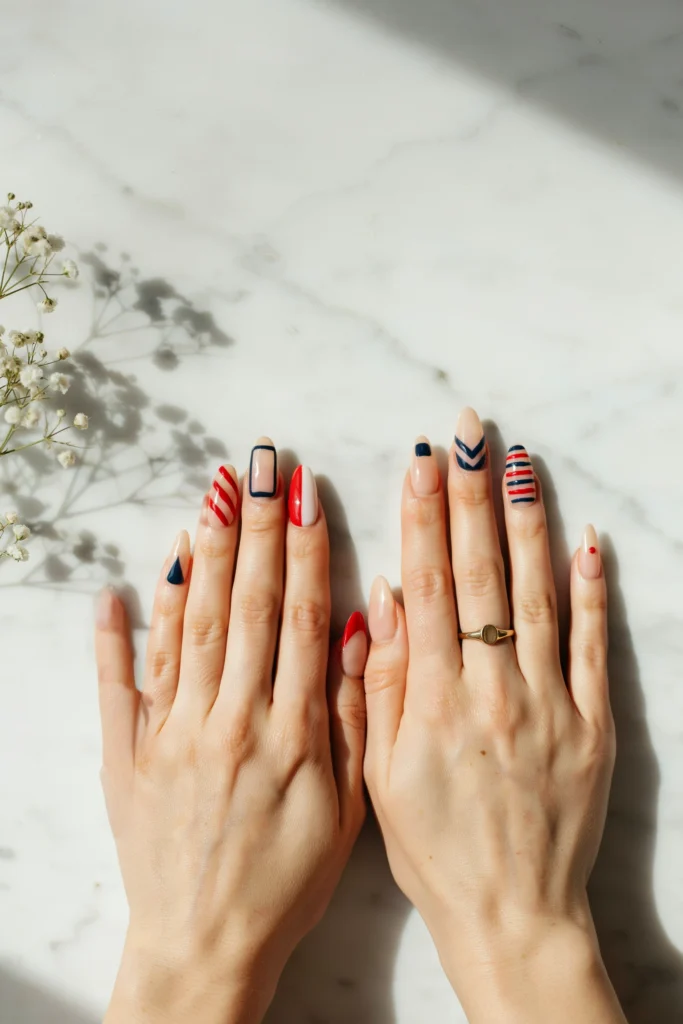
12. Navy and White Geometric Acrylic Nails
Clean geometric shapes in navy and white on a clear or nude acrylic base create a modern, graphic patriotic nail set that uses the contemporary language of geometric nail art in the patriotic color palette for an unexpected and genuinely sophisticated result.
How to Do It: Apply acrylic extensions in the preferred shape. Apply a clear or nude base coat to all nails. Using nail art tape create geometric sections on each nail. Triangles, rectangles, diagonal strips, and diamond shapes all work beautifully. Paint the taped sections in alternating navy and white. Remove tape while wet for clean geometric edges. Vary the geometric design slightly from nail to nail so each nail has its own individual geometric composition while sharing the same navy and white color palette with every other nail in the set. Seal with a glossy top coat.
Styling Tip: Leave a small unpainted gap of the nude or clear base visible at the edge of each geometric shape rather than painting the geometric sections all the way to the skin edge of the nail. The visible nude border creates a negative space frame that makes every geometric shape look more deliberate and more precisely placed than it would if painted to the full nail edge.
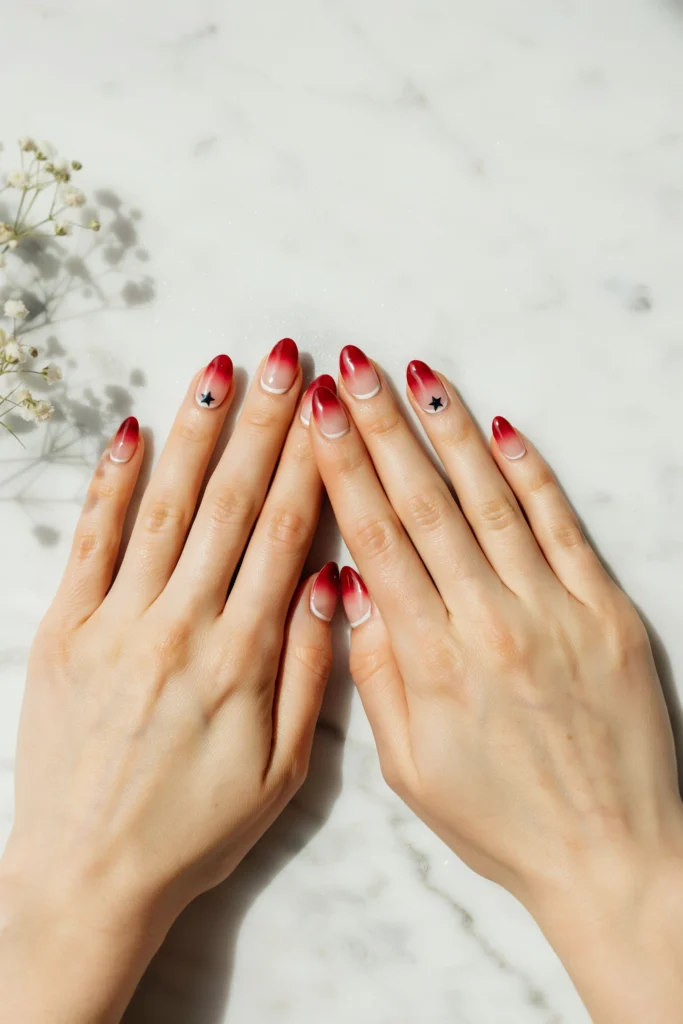
13. Simple Red Ombre with White Tips
A red to white ombre gradient across the body of each acrylic nail combined with a clean white French tip at the nail edge creates a delicate, feminine, and genuinely beautiful patriotic nail look that is unexpected in its softness.
How to Do It: Apply acrylic extensions in the preferred shape. Apply a white base coat to all nails. Sponge a red to white ombre gradient onto each nail concentrating the deep red at the nail base and fading to white toward the tip. Allow to dry completely. Apply a thin white French tip over the ombre gradient at the nail edge using a fine nail art brush or a French tip guide. The white tip sits over the lightest section of the ombre gradient creating a seamless, soft transition from the tip into the gradient below. Seal with a glossy top coat.
Styling Tip: Add a single small navy blue star to the accent nail on each ring finger as the only additional patriotic detail in the set. The navy star on the ring finger introduces the third patriotic color and gives the full set a deliberate accent focal point without disrupting the soft, delicate quality of the red to white ombre on the remaining eight nails.
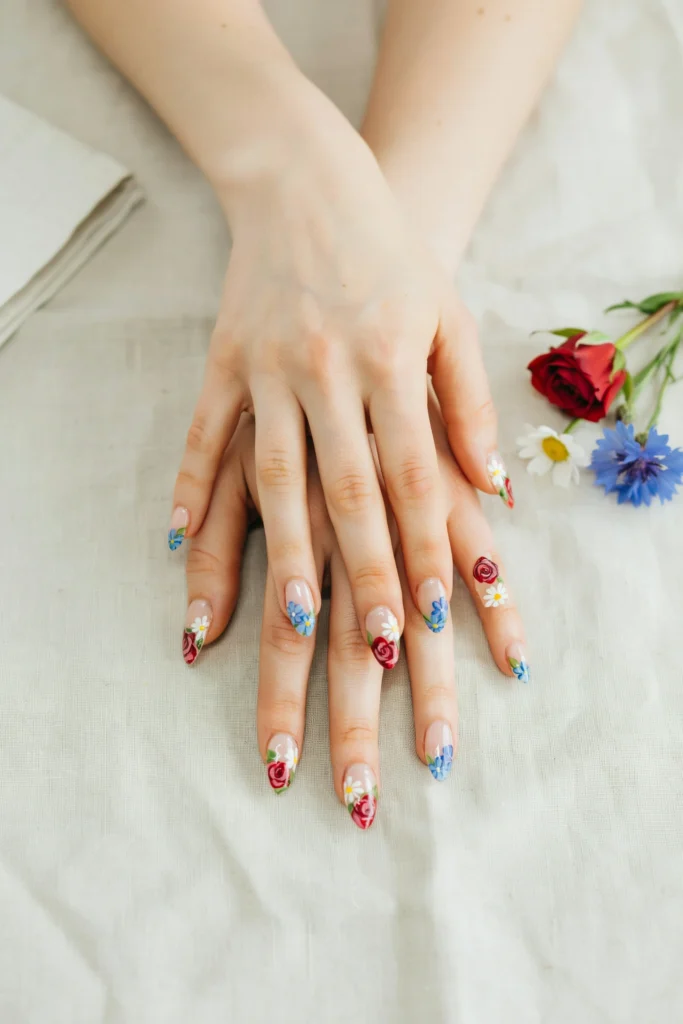
14. Patriotic Floral Acrylic Coffin Nails
Hand-painted patriotic flowers, red roses, white daisies, and blue forget-me-nots or cornflowers, on a clear or white coffin acrylic base create the most romantic and the most genuinely artisan simple patriotic acrylic set on this list.
How to Do It: Apply acrylic extensions in the coffin shape. Apply a clear or white gel base coat to all nails and cure. Using a fine detail brush and nail art paint in red, white, blue, and green, paint small floral designs across the surface of each nail. Begin with the largest flowers first. Red roses are created with a series of small curved petal strokes around a central point. White daisies use straight outward strokes around a yellow center dot. Blue cornflowers use small teardrop strokes radiating outward. Add small green leaf details between the flowers. Seal with a glossy top coat.
Styling Tip: Paint fewer flowers per nail than feels instinctively comfortable. Three flowers per nail with visible clear base between them looks deliberately designed. Eight flowers per nail with no visible base looks crowded and difficult to read as individual flower designs. The space between the flower clusters is as important as the flowers themselves.
15. Red White and Blue Glitter Ombre Acrylics
A glitter ombre that transitions from red glitter at the nail base through white glitter at the center to blue glitter at the tip creates one of the most visually spectacular and the most photographable patriotic acrylic nail designs on this list.
How to Do It: Apply acrylic extensions in the preferred shape. Apply a white gel base coat to all nails and cure. Apply red glitter gel polish to the base third of each nail using a small flat brush and feathering the top edge outward in light strokes. Apply white fine glitter gel to the center third overlapping the red section slightly. Apply blue glitter gel to the tip third overlapping the white section slightly. Build each color section through two applications for full glitter density. Cure under UV lamp. Apply a smooth gel top coat to seal all glitter completely. Cure again.
Styling Tip: Apply the gel top coat in at least two thick coats over the glitter ombre because a single coat of top coat over loose glitter creates a surface that is still slightly rough and textured rather than the smooth glass-like finish that makes glitter ombre nails look genuinely professional. Two thick top coat coats completely smooth every glitter surface.

16. Simple Navy Almond with Star Stamping
Navy almond acrylics with a patriotic star and stripe stamped design applied across every nail using a nail stamping plate creates a complete, detailed, and genuinely impressive patriotic acrylic set that requires minimal freehand skill.
How to Do It: Apply acrylic extensions in the almond shape. Apply two coats of deep navy gel polish to all nails and cure completely. Apply white stamping polish to a patriotic-themed stamping plate section featuring stars, stripes, or flag-inspired patterns. Scrape away excess polish. Press the stamper firmly onto the plate. Roll the stamper firmly onto the first nail in a single forward motion. Lift cleanly. Repeat for all remaining nails. Allow to dry briefly. Apply a fast-dry top coat formulated specifically for use over stamping.
Styling Tip: Stamp every nail with the same design section of the stamping plate for a cohesive, matching set rather than varying the stamped design from nail to nail. A stamped set where every nail shows the same pattern across the full set looks like a professionally designed matching nail collection. A set where each nail shows a different stamped pattern looks like a sampler of different designs rather than a unified set.
17. Patriotic Negative Space Coffin Nails
Geometric negative space designs in red and navy on coffin acrylics leave sections of the clear or nude acrylic base exposed as a design element. The result is a modern, editorial, and genuinely sophisticated patriotic nail look.
How to Do It: Apply acrylic extensions in the coffin shape. Apply a clear or nude gel base coat to all nails and cure. Apply nail art tape in geometric configurations across each nail creating masked sections of the base. Paint the exposed sections alternating between red and navy across the full set. Remove tape while slightly wet. The unpainted tape sections reveal the clear or nude base as the negative space design element. Vary the geometric tape configuration slightly from nail to nail while keeping the same two-color palette throughout. Seal with a glossy top coat.
Styling Tip: Keep the negative space sections genuinely large enough to read clearly as a design element rather than as missed coverage. The negative space in a negative space nail design should occupy at least one third of the total nail surface area. Smaller negative space sections look like paint mistakes rather than deliberate design decisions.
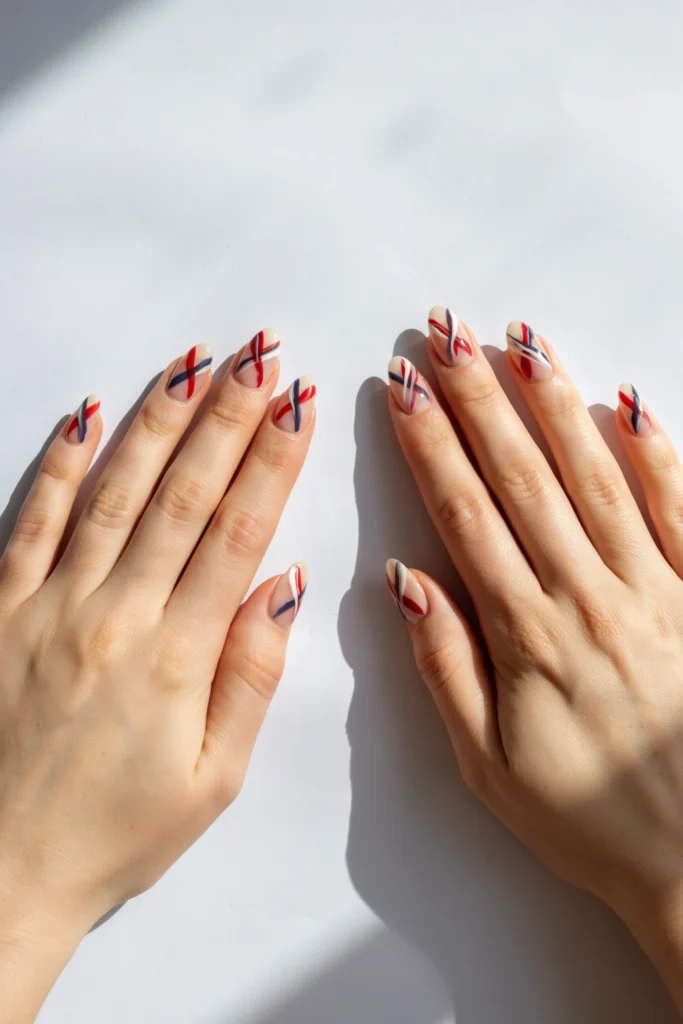
18. Red White and Blue Abstract Acrylic Art
Loose, abstract brushstroke designs in red, white, and blue applied across a clear acrylic base create the most artistic and the most genuinely expressive patriotic nail set on this list. Abstract nail art requires no precision and rewards spontaneity.
How to Do It: Apply acrylic extensions in the preferred shape. Apply a clear gel base coat to all nails and cure. Using a flat nail art brush loaded with red nail art paint make two to three loose, confident diagonal brushstrokes across the first nail. Clean the brush. Load with white and add one to two strokes at a different angle. Clean the brush. Load with navy and add one stroke crossing the previous colors. Repeat this three-color abstract brushstroke process across every nail varying the direction and the density of the strokes from nail to nail. Seal with a glossy top coat.
Styling Tip: Apply every abstract brushstroke in a single, confident motion without going back to add to or correct a placed stroke because confident single strokes produce the loose, painterly quality of genuine abstract nail art while corrected or reworked strokes produce muddy, overworked marks that look neither abstract nor intentional. Commit to every stroke and move to the next one immediately.
19. Simple Patriotic Jelly Acrylic Nails
Sheer jelly-finish gel polish in rotating patriotic colors applied over an acrylic base creates the most modern, translucent, and quietly contemporary patriotic acrylic nail look on this list. The jelly finish over acrylic has an extraordinary glass-like quality.
How to Do It: Apply acrylic extensions in the preferred shape. Apply a clear gel base coat to all nails and cure. Apply sheer red jelly gel polish to three nails on each hand building the translucent color through three to four thin coats rather than one or two thick ones. Apply sheer white jelly gel to two nails on each hand in the same thin-coat layering technique. Apply sheer blue jelly gel to the remaining nails. Cure between every coat. Apply a high-shine glossy gel top coat for the maximum glass-nail effect.
Styling Tip: Use a UV lamp rather than an LED lamp to cure jelly gel polish if possible because UV lamps cure sheer jelly formulas more thoroughly and more evenly than LED lamps which can leave jelly gel polish slightly undercured in the center of the nail where the thin formula pools during the curing process. Thorough curing is essential for jelly nails to achieve their characteristic glass-like hardness and clarity.
20. Navy Blue Chrome Coffin Nails with Stars
Deep navy chrome coffin acrylics with gold star details create the most glamorous and the most evening-appropriate patriotic acrylic set on this list. The chrome finish photographs with a mirror-like intensity that makes every fireworks photograph genuinely spectacular.
How to Do It: Apply acrylic extensions in the coffin shape. Apply navy gel polish as the base and cure. Apply a no-wipe gel top coat and cure completely. Using a chrome applicator sponge rub navy blue chrome powder firmly onto every nail surface until a complete mirror finish appears. Apply a gold nail art pen or a fine brush loaded with gold nail art paint to draw or stamp small stars across two to three nails per hand. Allow the gold to dry. Seal with a gel top coat and cure.
Styling Tip: Apply the gold star details after the chrome powder has been rubbed onto the nail surface but before the final sealing top coat so the gold stars are sealed beneath the top coat and protected from scratching and peeling throughout the full wear period of the set.
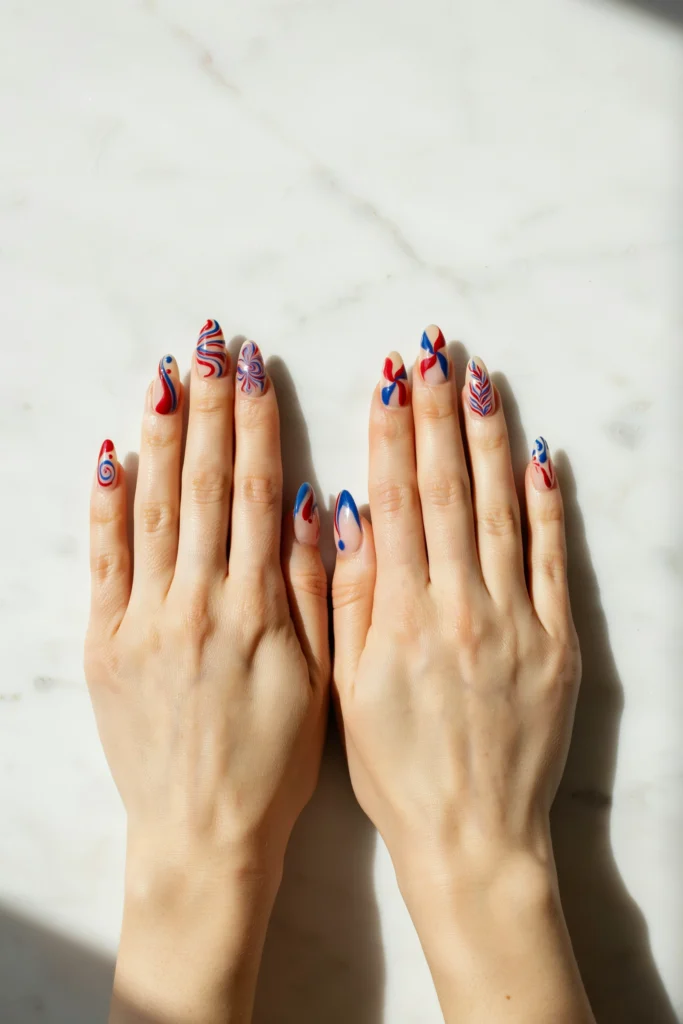
21. Red and Blue Swirl Acrylic Nails
Red and blue swirled on a white or clear acrylic base create one of the most fluid and the most painterly patriotic acrylic nail designs on this list. The swirl technique is forgiving, organic, and produces a different beautiful result on every nail.
How to Do It: Apply acrylic extensions in the preferred shape. Apply a white gel base coat to all nails and cure. While the nail surface is still slightly tacky from a second uncured gel layer drop a small amount of red gel nail art paint and a small amount of navy gel nail art paint onto the nail surface side by side. Using a thin nail art brush or a wooden cuticle stick drag through both colors in long, fluid curves creating swirl patterns. Cure the swirl design under UV lamp immediately. Apply a glossy gel top coat and cure.
Styling Tip: Work with only one nail at a time through the entire swirl process including the curing step before moving to the next nail. The gel swirl design must be cured immediately after it is created because gel paint begins to self-level and the swirl pattern begins to blur within thirty to forty-five seconds of application on a warm nail surface in a warm room.
Bottom Line
Acrylic nails give 4th of July nail art a canvas that is larger, smoother, and more durable than any natural nail can provide. Every design on this list was chosen because it uses that canvas well. Because it takes the patriotic palette and renders it in a shape, a finish, and a technique that is genuinely on-trend, genuinely achievable, and genuinely worth the time and the care it requires. Choose the design that excites you most. Take it to your nail technician or attempt it at home with confidence. And know that whatever you choose from this list will make every photograph taken at this 4th of July celebration more beautiful for what is at the ends of your fingers.