The most beautiful classroom decorations are never the most expensive ones. They are the most personal ones. The ones where the evidence of the maker’s hand is visible in every cut edge and every brush stroke and every carefully placed detail. A DIY classroom or back to school decoration communicates something that a purchased decoration never can. It communicates that the person who made it cared enough to spend their own time and their own creative energy on this space and on the people who would inhabit it. These 15 back to school diy decoration ideas were chosen because every single one of them is genuinely achievable by any person regardless of their craft skill level. Every one uses affordable, accessible materials available at any craft store. Every one produces a result that looks significantly more impressive than the effort and the cost required to make it. And every single one of them will make the classroom or the learning space it decorates feel genuinely special from the very first moment of the very first day.
The DIY Ideas
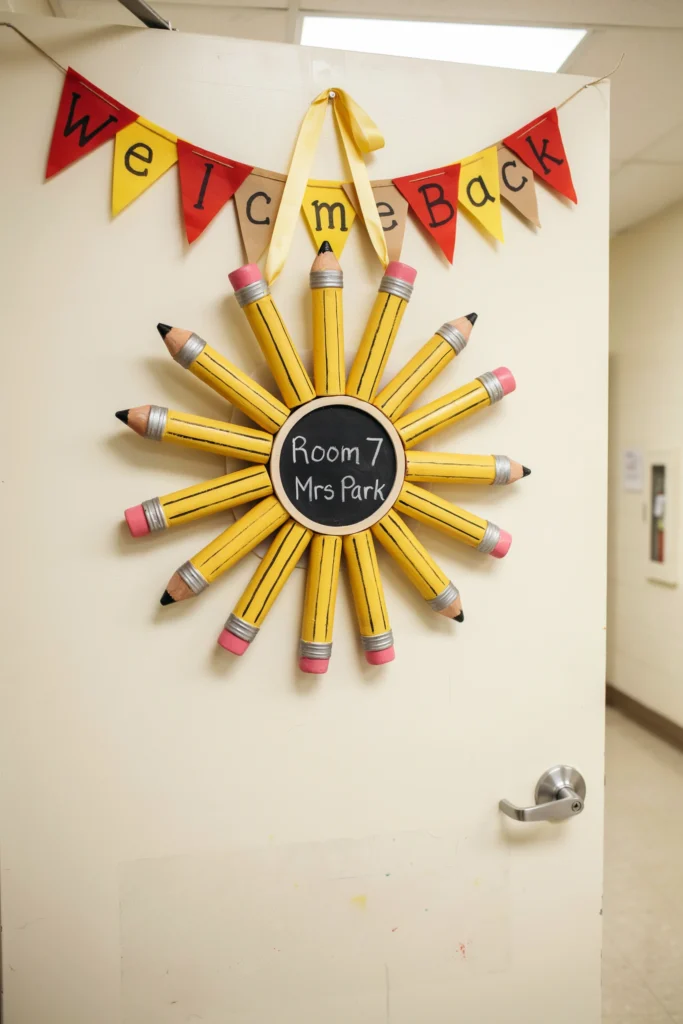
1. DIY Pencil Wreath Classroom Door
A handmade pencil wreath made from yellow foam or cardstock pencil shapes arranged in a circular formation creates one of the most charming, the most school-appropriate, and the most immediately recognizable DIY back to school door decorations available. It is genuinely simple to make and genuinely beautiful to display.
How to Recreate This Look: Cut approximately twenty to twenty-five pencil shapes from yellow foam sheets or yellow cardstock. Make each pencil approximately twenty-five centimeters long and four centimeters wide. Add the pencil details with a black marker. The eraser section in pink. The metal ferrule in grey. The sharpened tip in a light wood tone. The pencil body in yellow with a thin dark stripe near the ferrule. Arrange the pencils in a circular wreath formation on a flat surface with each pencil pointing outward from the center like the spokes of a wheel. Glue each pencil to its neighbors at two contact points using a strong craft adhesive. Allow to cure completely. Add a central focal element at the wreath center. A chalkboard circle with the class name and room number. Attach a ribbon hanger at the back.
Decor Pairings: Pair with a hand-lettered paper banner made from individual kraft paper pennant flags strung on a length of twine hung directly above the pencil wreath on the door frame reading Welcome Back in the classroom color palette so the pencil wreath on the door has a text companion above it that completes the door display with a direct, warm welcome message.
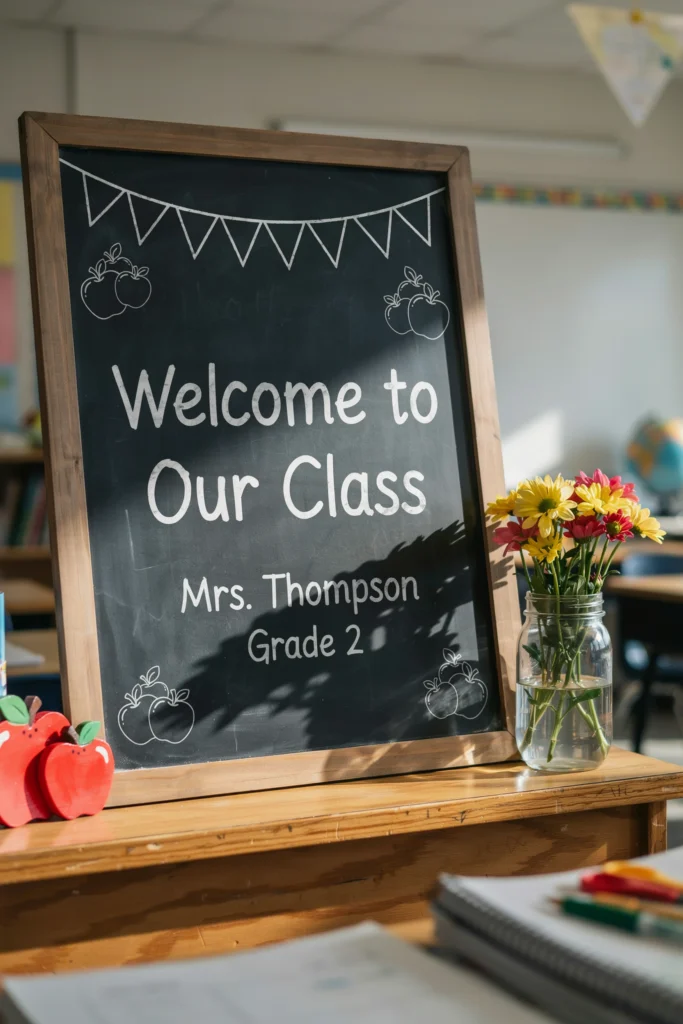
2. DIY Chalkboard Welcome Sign
A hand-lettered chalkboard welcome sign made from a simple painted board or a purchased chalkboard frame is one of the most impactful and the most personally expressive DIY back to school decorations available. The combination of the teacher’s own handwriting at display scale communicates genuine personality and genuine warmth.
How to Recreate This Look: Purchase a plain wooden board or a pre-framed chalkboard from a craft store. If using a plain board apply two coats of chalkboard paint and allow to cure for twenty-four hours. Season the cured chalkboard surface by rubbing the side of a chalk stick across the full surface and then erasing completely before the first design application. Plan the design on paper first. Apply the lettering using chalk pens for the most vivid, most weather-resistant result. Include the teacher’s name, the class name, and a warm welcome message. Add illustrated border elements. Apple clusters, pencil illustrations, book stacks, or simple star and bunting details. Seal with chalk fixative spray for durability.
Decor Pairings: Pair with a small cluster of fresh or faux flowers in a mason jar and two small hand-painted wooden apple shapes placed at the base of the chalkboard sign on the shelf or surface where it is displayed so the graphic, illustrated chalkboard has a three-dimensional organic companion at its base that adds warmth, color, and genuine handcrafted quality to the complete display.
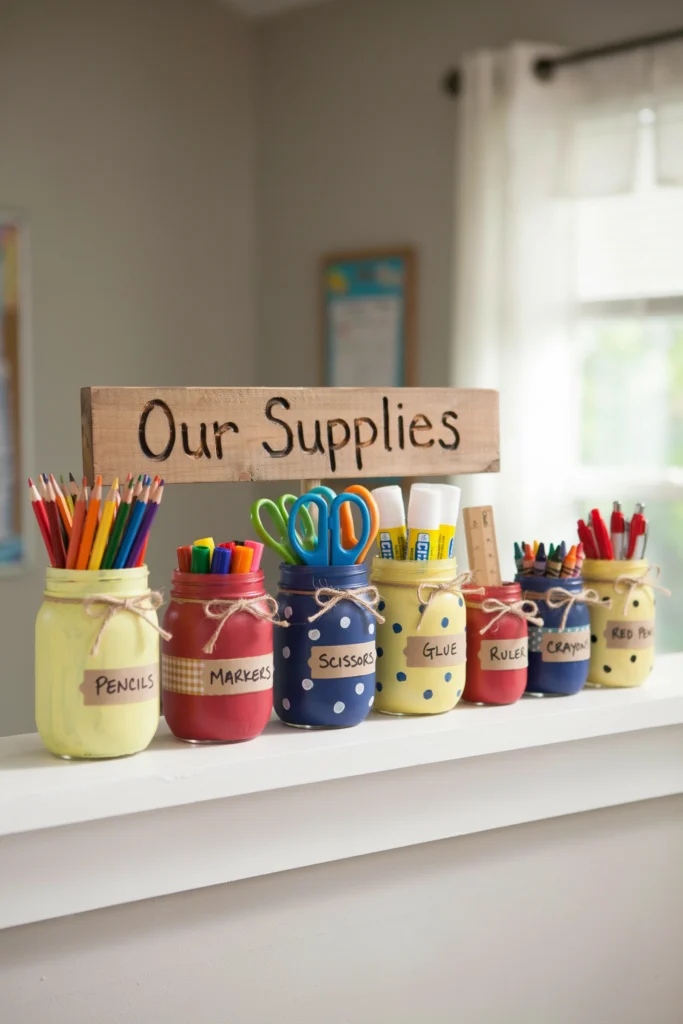
3. DIY Back to School Mason Jar Display
A collection of decorated mason jars used as classroom supply holders creates one of the most affordable, the most charming, and the most practically beautiful DIY back to school decorations available. The entire set can be made in an afternoon and costs almost nothing.
How to Recreate This Look: Gather eight to ten clean mason jars in different sizes. Apply chalk paint to each jar in the classroom color palette using a foam brush in two thin coats. Allow to dry completely between coats. Add decorative details to each jar once the base coat is fully dry. Stenciled patterns, washi tape bands, twine wrapping, or simple hand-painted polka dots. Write each jar’s contents label directly on the chalk paint surface using a chalk pen for an easily updatable label. Alternatively attach kraft paper labels tied with natural twine. Fill each decorated jar with its designated classroom supply and arrange on the supply shelf in a deliberate, sized sequence from tallest to shortest.
Decor Pairings: Pair with a small DIY wooden sign mounted on the wall above the mason jar display made from a piece of scrap wood with the words Our Supplies hand-lettered in paint or burned with a wood burning tool so the beautifully decorated supply jar collection has a simple, personal text element above it that gives the display a named, considered identity within the classroom space.
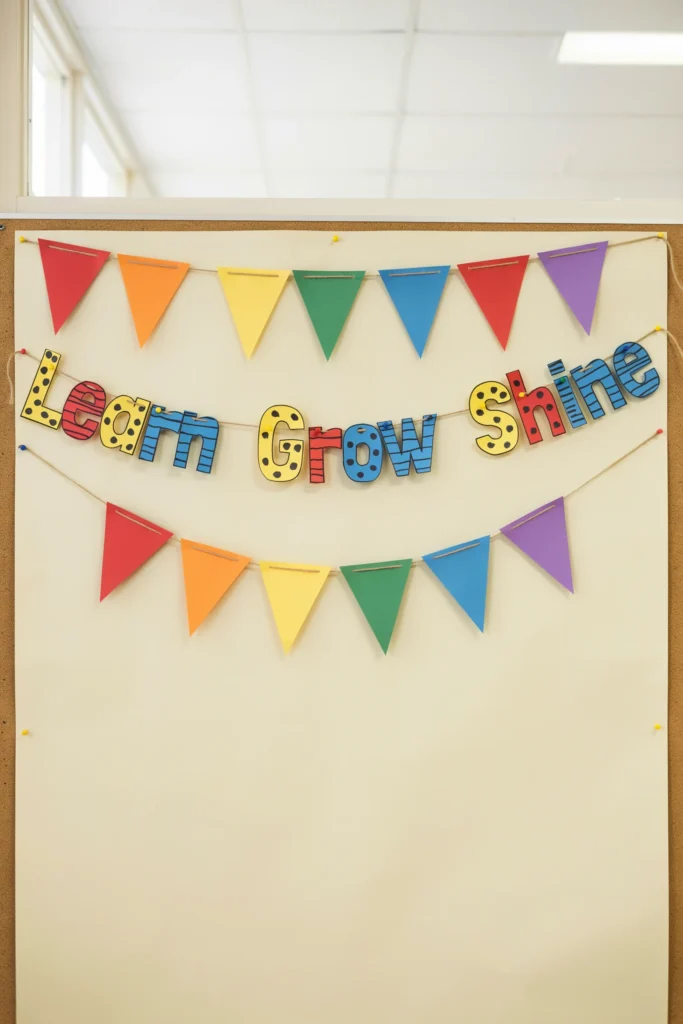
4. DIY Bulletin Board Letter Banner
A handmade bulletin board letter banner made from individual die-cut or hand-cut letters strung on baker’s twine creates one of the most versatile and the most visually impactful DIY back to school classroom decorations available. The banner can be made to say anything and in any color combination.
How to Recreate This Look: Choose the banner message. Effective back to school banner messages include Welcome Back, Learn Grow Shine, Every Day is a New Adventure, and the specific class name or teacher name. Cut individual letters from cardstock, foam sheets, or felt in the classroom color palette. Use a letter die-cut machine for the most precise result or hand-cut using a printed letter template. Add decorative details to alternating letters. Polka dots on every other letter. Striped patterns on the remaining letters. Thread all letters onto a length of baker’s twine with a small loop of thin wire at the back of each letter. Space the letters evenly with a small gap between each word. Attach the banner to the bulletin board or the classroom wall using push pins.
Decor Pairings: Pair with small paper bunting triangles in coordinating colors hung above and below the letter banner so the main letter display is framed by bunting both above and below and the complete bulletin board top section reads as a layered, designed textile installation rather than a single banner placed without context.
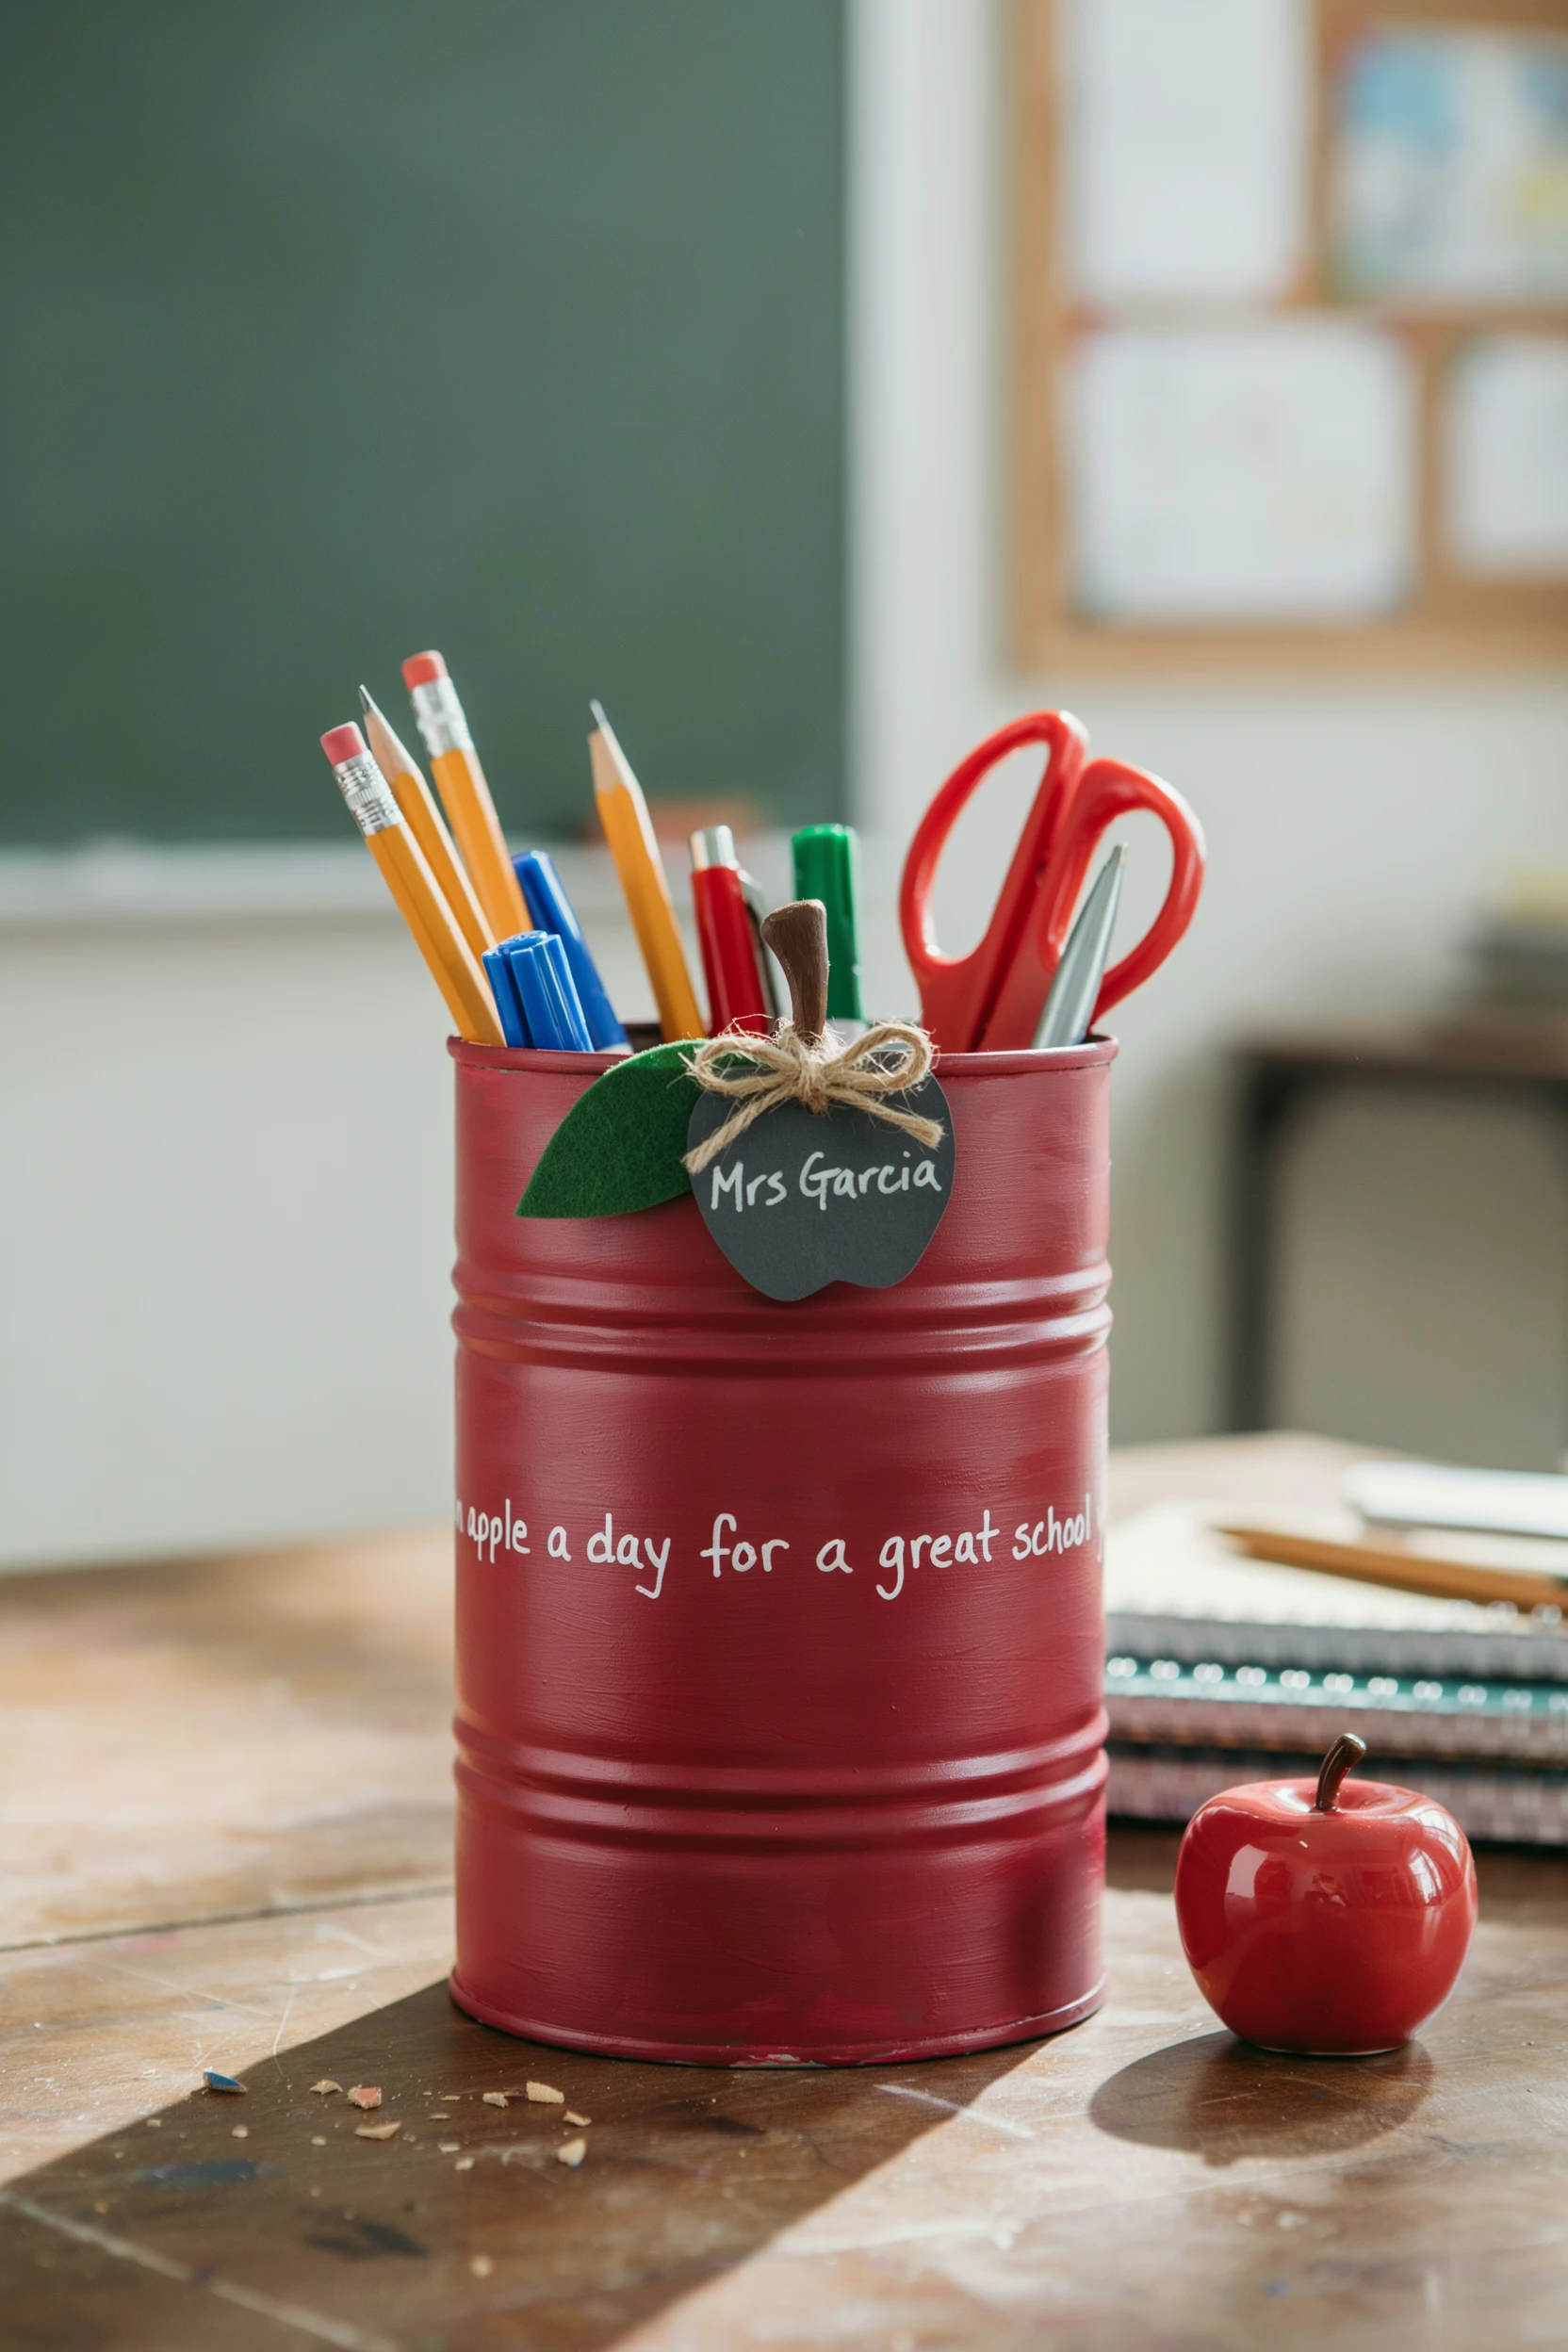
5. DIY Apple Themed Supply Caddy
A DIY apple themed supply caddy made from a painted tin can or a wooden crate decorated with apple motifs creates one of the most classically school-appropriate and the most genuinely charming DIY back to school supply display pieces available.
How to Recreate This Look: Source a large tin can, a small wooden crate, or a standard plastic caddy as the base vessel. Clean and dry completely. Apply two coats of red chalk paint to the exterior for the apple body color. Allow to dry completely. Add a green leaf cutout made from green craft foam or green felt to one side of the can using strong adhesive. Paint a small brown stem detail at the top of the can. Add a small worm cutout peeping over the can rim if a playful detail is desired. Hand paint a small apple-themed message on the red surface. Teachers plant the seeds of knowledge or An apple a day for a great school year. Seal with clear matte varnish. Fill with pencils, markers, and rulers.
Decor Pairings: Pair with a small matching apple-shaped chalkboard label tag tied to the caddy handle or rim with twine bearing the class name or the teacher’s name so the DIY apple supply caddy has a personalized identity tag that makes it genuinely specific to its classroom rather than simply a generic apple-themed container.

6. DIY Back to School Photo Frame Wall
A DIY back to school photo frame wall using a collection of mismatched frames painted in a consistent color creates one of the most personal and the most genuinely beautiful back to school decorations available for any classroom or home learning space.
How to Recreate This Look: Source eight to twelve picture frames in a variety of sizes and styles from thrift stores, charity shops, or the home. Remove all glass and backing from each frame. Apply two coats of chalk paint in the classroom color palette to every frame exterior. A single consistent color across all frames creates the visual cohesion that makes a mismatched frame collection look deliberately curated. Allow to dry completely. Arrange the painted frames on the classroom wall in a gallery composition before committing to nail positions. Leave some frames empty as negative space design elements. Fill others with printed first-day photographs, student artwork, classroom quotes, and hand-lettered subject headers. Update the frame contents throughout the year.
Decor Pairings: Pair with a small printed label below each frame identifying its contents or its purpose in the classroom display system so guests, parents, and students can immediately understand the organizational logic of the photo frame wall display rather than experiencing it simply as a decorative installation without a clear narrative purpose.

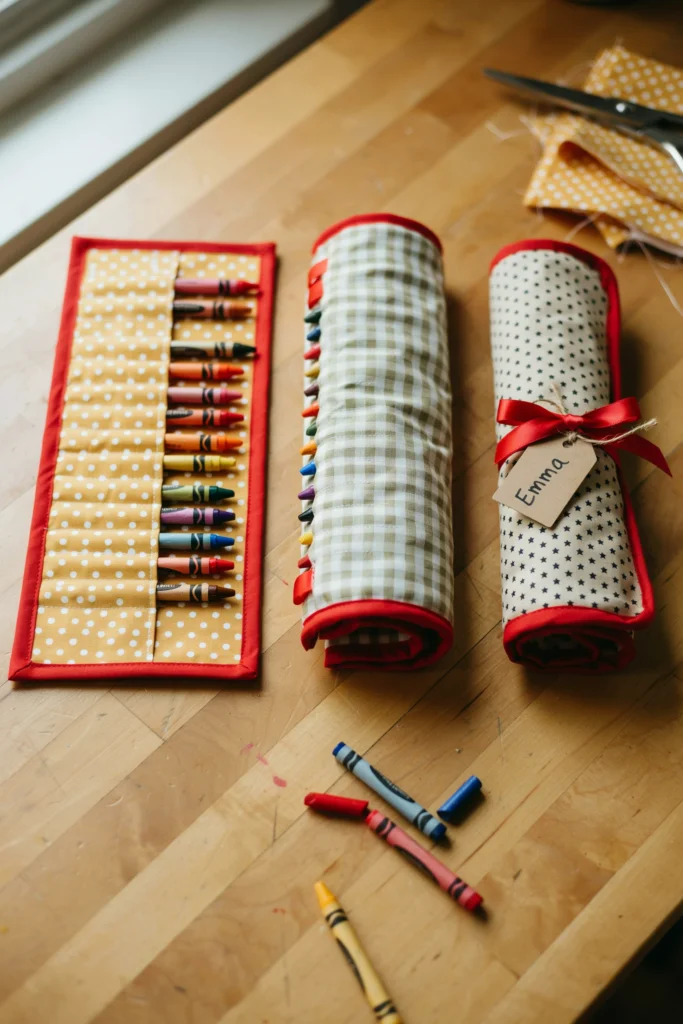
7. DIY Crayon Roll Supply Organizer
A handmade fabric crayon roll supply organizer is one of the most beautifully crafted and the most genuinely functional DIY back to school projects on this list. Made from simple fabric rectangles and basic hand sewing it creates a beautiful, portable supply organizer that every child who receives one will genuinely treasure.
How to Recreate This Look: Cut two rectangles of coordinating cotton fabric approximately thirty by twenty centimeters. Cut one rectangle of batting the same size. Layer in a sandwich with batting in the center. Sew a series of vertical pockets across the lower half of the fabric sandwich at even intervals approximately two centimeters wide, enough for one crayon each. Bind all edges with coordinating bias tape in a contrasting color. Attach a long ribbon tie at the center of one long edge for rolling and securing. Roll the finished organizer up from the bottom enclosing all the pockets and tie the ribbon to hold it closed. Insert crayons into each completed pocket.
Decor Pairings: Pair with a small personalized gift tag made from a kraft paper circle tied to the ribbon of each completed crayon roll bearing the child’s name and a small hand-stamped apple or star illustration so every DIY crayon roll is not just a supply organizer but a genuinely personalized gift that communicates the teacher’s individual care for each specific child in the class.
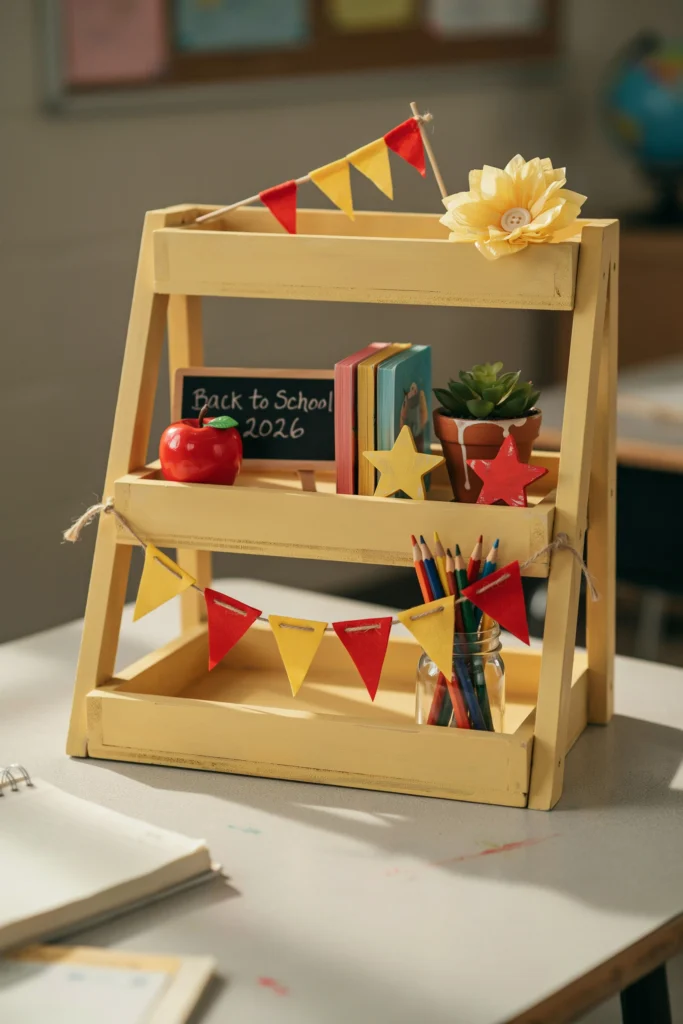
8. DIY Back to School Tiered Tray
A DIY back to school tiered tray styled with handmade and found objects creates one of the most charming and the most Instagram-worthy back to school decorations available for any teacher’s desk, classroom counter, or home learning space.
How to Recreate This Look: Purchase a plain two or three tier tray stand or make one using two cake tins and a short length of threaded rod with nuts and washers as the connecting hardware. Paint or chalk paint the tray surfaces in the classroom palette. Style each tier with a mix of DIY and found objects. Bottom tier: a small DIY chalkboard sign reading Back to School 2026, a red painted apple from the craft store, and a small mason jar of hand-sharpened pencils. Middle tier: a small stack of three colorful miniature books, a tiny hand-painted ceramic pot with a succulent, and two small hand-painted wooden stars. Top tier: one hand-made paper flower in the classroom color and a single mini flag pick.
Decor Pairings: Pair with a short DIY fabric bunting garland in the classroom palette draped across the front face of the bottom tray tier so the styled tiered tray has a textile decorative element that adds color, softness, and a handmade textile quality to the otherwise hard-surfaced tray and object display.
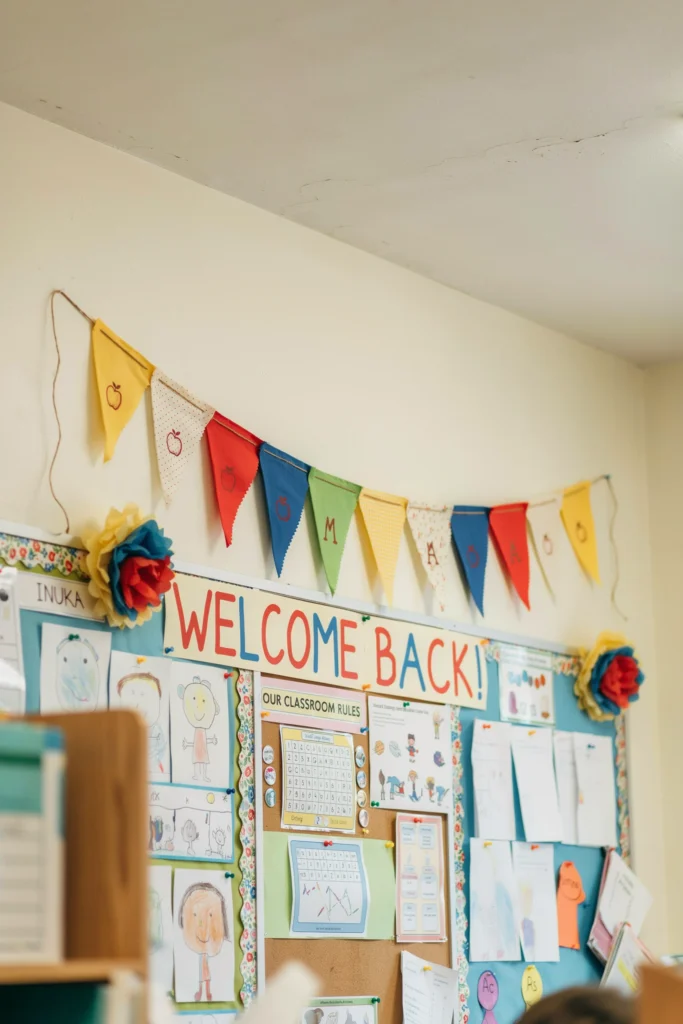
9. DIY Classroom Bunting Garland
A handmade fabric or paper bunting garland in the classroom color palette is one of the most affordable, the most versatile, and the most instantly cheerful DIY back to school decorations available. A single afternoon of cutting and gluing produces enough bunting to transform multiple classroom surfaces.
How to Recreate This Look: Cut equilateral triangles approximately fifteen centimeters on each side from a combination of patterned and solid fabric or cardstock in the classroom color palette. Use pinking shears on fabric for a decorative, no-hem edge. Fold the top edge of each triangle over a length of baker’s twine by one and a half centimeters and glue firmly in place. Alternate patterned and solid triangles throughout the garland. Add personalized details to every fourth or fifth triangle. A child’s name initial, a small stamped apple, a painted star, or a simple stripe pattern. Leave approximately four centimeters of bare twine between each triangle for a generous, light spacing effect.
Decor Pairings: Pair with coordinating paper rosette decorations made from the same cardstock colors used in the bunting positioned at the two anchor points where the bunting is attached to the wall or bulletin board so the bunting garland has decorative focal points at each of its two ends rather than simply trailing off into a plain pin or hook attachment.
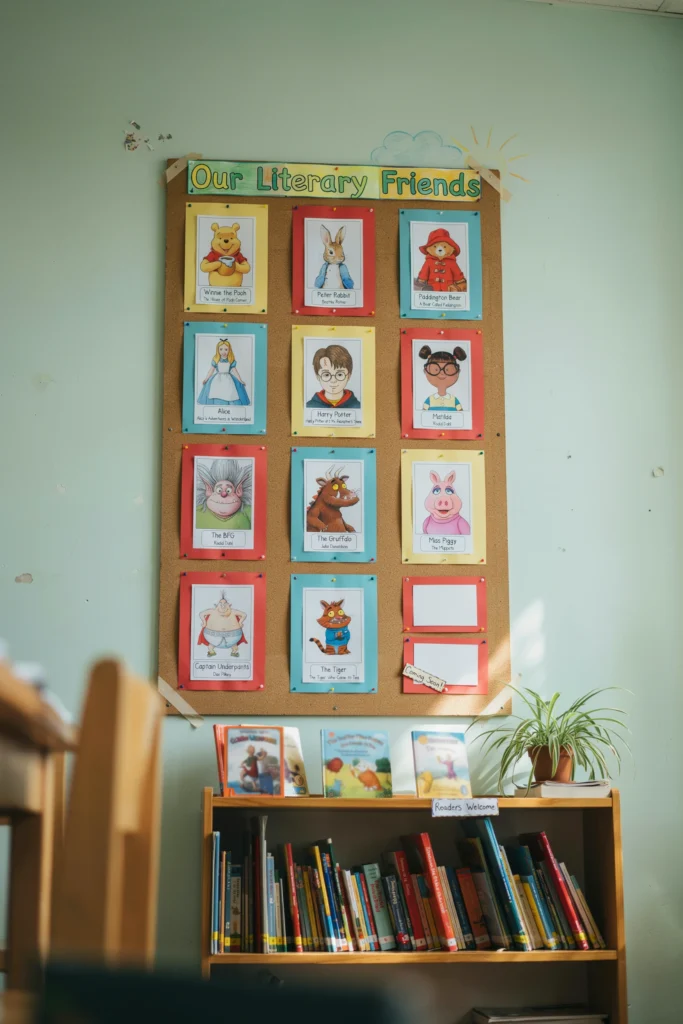
10. DIY Book Character Display Board
A large DIY book character display board featuring hand-drawn or printed illustrations of beloved children’s book characters creates one of the most literacy-promoting and the most visually exciting back to school decorations available for any reading-focused classroom.
How to Recreate This Look: Choose eight to twelve beloved children’s book characters that the class will encounter during the year. Create or print large illustrated portrait panels of each character approximately twenty-five centimeters square. Frame each portrait in a simple hand-made frame of cardstock in the classroom palette. Add a small caption below each portrait with the character’s name and the book title. Arrange all framed
character portraits in a gallery grid on a dedicated classroom wall section. Add a banner above reading Our Literary Friends or The Characters We Will Meet This Year. Leave two or three empty frame spaces for characters to be added as new books are read throughout the year.
Decor Pairings: Pair with small real copies of each displayed book arranged face-out on a book display shelf directly below the character portrait wall so every child who looks up at the character display can immediately look down and find the actual book that character lives in and the visual character gallery and the physical book display together create a complete, immersive literacy environment.
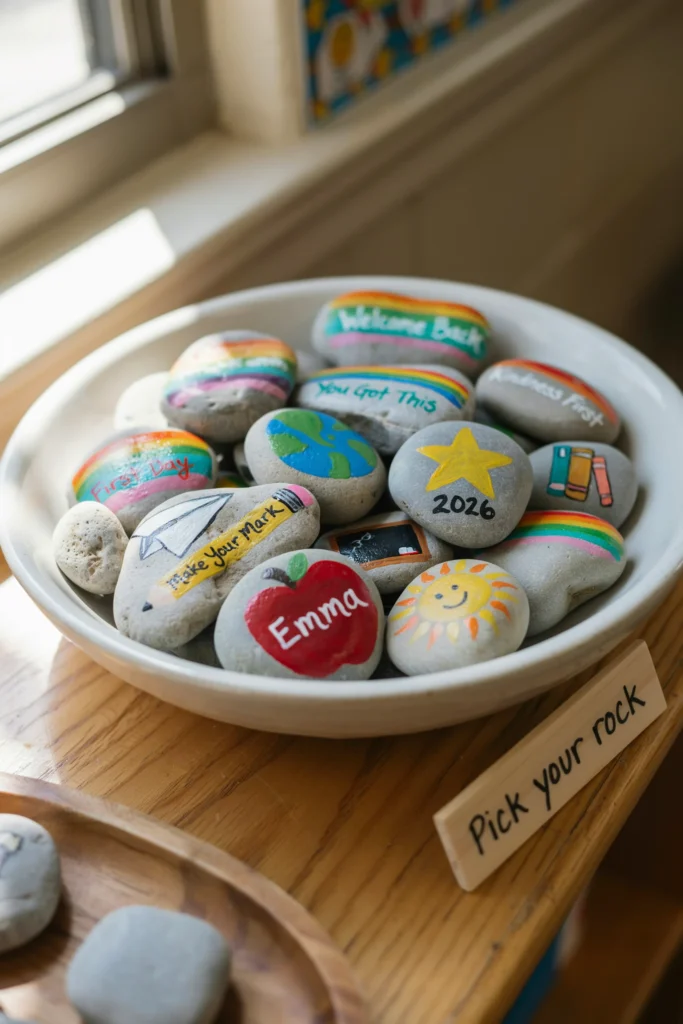
11. DIY Back to School Painted Rock Collection
A collection of hand-painted rocks with back to school messages, illustrations, and student names creates one of the most tactile, the most personal, and the most enduringly beautiful DIY back to school decorations available. The rocks can be used as paperweights, desk decorations, or gifts to individual students.
How to Recreate This Look: Collect smooth, flat river rocks of a consistent size approximately five to eight centimeters across. Wash and dry each rock completely. Apply a white acrylic paint base coat to every rock and allow to dry. Paint each rock with a different back to school design using acrylic craft paint and fine brushes. An apple with a student’s name. A stack of books with a reading motto. A pencil with a motivational phrase. A simple star with a class year number. A chalkboard-style message in black and white. A rainbow colored back to school message. Seal every finished rock with two coats of clear outdoor varnish for durability. Display in a wide shallow bowl or a galvanized tray on the classroom display shelf.
Decor Pairings: Pair with a small hand-lettered sign propped against the rock display reading Pick your rock and keep it on your desk so the rock collection is not a static display but an interactive first-day activity where each student selects a painted rock and keeps it on their desk throughout the year as a personal decorative and motivational object.
12. DIY Pencil Cup Centerpiece Display
A large DIY pencil cup centerpiece made from a decorated tin or a painted wooden container holding an abundant arrangement of new pencils, rulers, markers, and paper flowers creates one of the most cheerfully school-appropriate and the most practically beautiful DIY back to school display pieces available.
How to Recreate This Look: Source a large tin can, a wide-mouth mason jar, or a small wooden bucket as the base. Wrap the exterior completely in yellow paper or paint in yellow chalk paint for the pencil body color. Add a pink paint or paper band near the top for the eraser section. Add a grey paint or paper band above the pink for the ferrule. Cut the very top edge of the wrapping or paint to a triangular point on one side to suggest the sharpened pencil tip. Fill the finished pencil-shaped container with a full arrangement of new unsharpened pencils in multiple colors arranged upright with their eraser ends up, several wooden rulers fanned outward at the back, three or four bright markers, and three DIY paper flowers on pencil stems made from tissue paper circles gathered and attached to the pencil top.
Decor Pairings: Pair with a small hand-lettered kraft paper tag tied around the pencil cup reading Ready for a Sharp Year so the DIY pencil cup centerpiece has a playful back to school pun text element that communicates the teacher’s genuine sense of humor and personal warmth alongside the visual charm of the oversized pencil-shaped supply container.

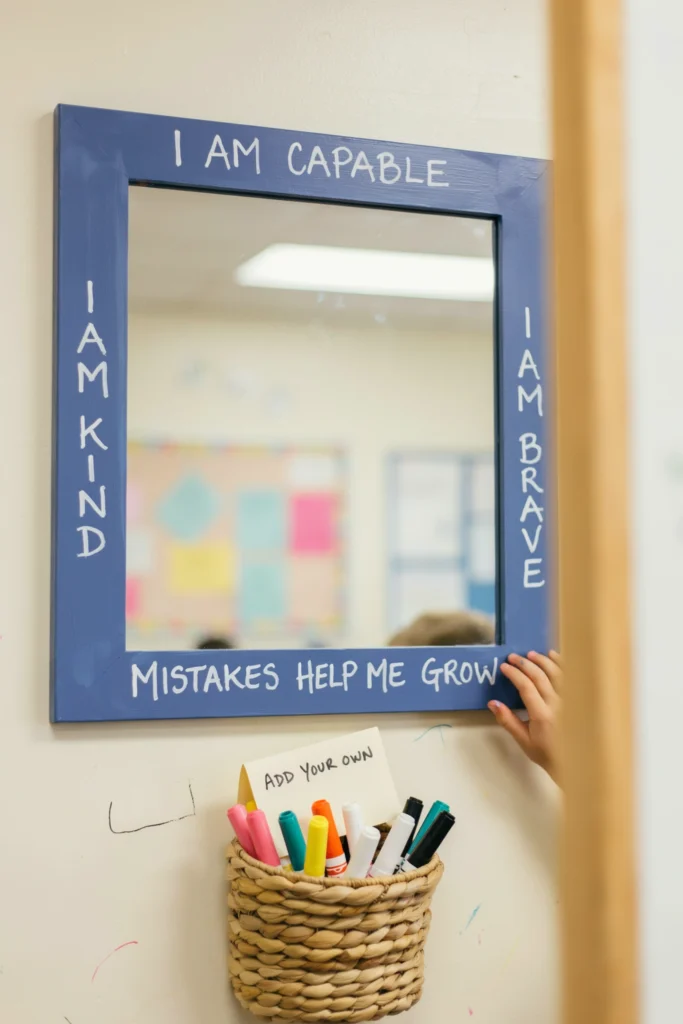
13. DIY Classroom Affirmation Mirror A DIY classroom affirmation mirror with hand-lettered positive affirmations written directly on the mirror frame or on sticky note cards arranged around the mirror perimeter creates one of the most emotionally nurturing and the most genuinely powerful DIY back to school decorations available.
How to Recreate This Look: Source a large plain-framed mirror from a thrift store or a budget home goods store. Paint the frame in the classroom color palette using chalk paint. Allow to dry completely. Apply positive affirmations directly to the frame surface using a white chalk pen or a paint pen. Write a different affirmation on each section of the frame. I am capable. I am kind. I am brave enough to try. Mistakes help me grow. I belong here. I am enough. Add small illustrated star or heart details between the affirmations. Mount the mirror at child height on the classroom wall near the door so every child sees their own reflection surrounded by affirmations at the beginning and the end of every school day.
Decor Pairings: Pair with a small basket of dry erase markers mounted below the mirror with a note reading Add your own affirmation so students can write temporary personal affirmations on the mirror glass itself throughout the year creating an evolving, student-contributed affirmation layer on top of the permanent teacher-created frame affirmations.
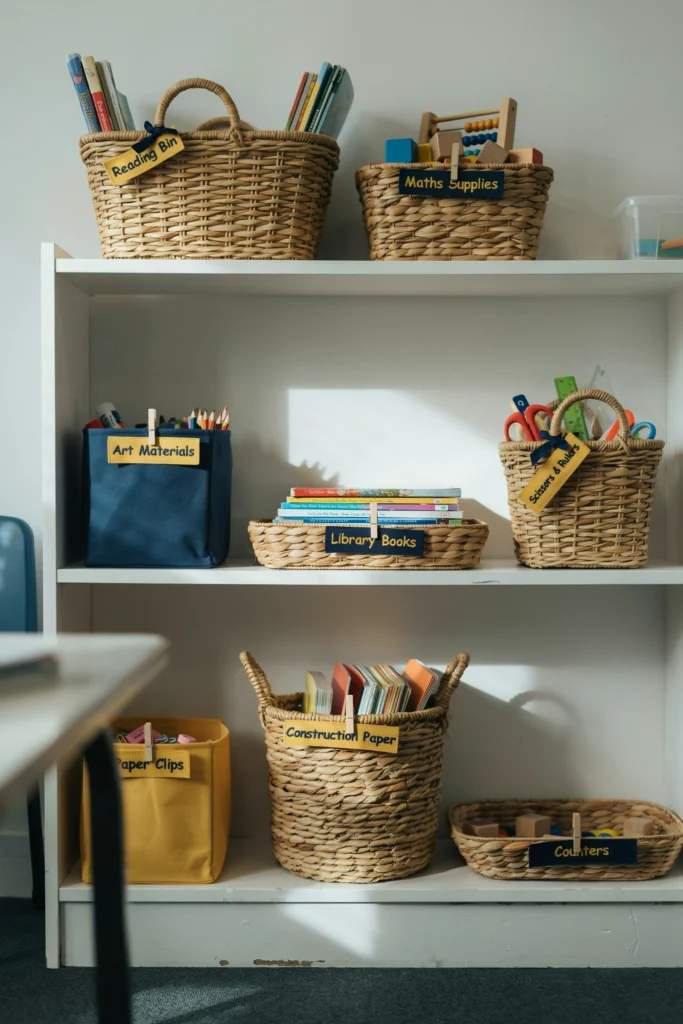
14. DIY Back to School Fabric Bin Labels
A complete set of DIY fabric bin labels made from coordinating fabric scraps and iron-on letters creates the most beautifully cohesive and the most genuinely handcrafted organizational decoration available for any classroom book bin, supply bin, or storage system.
How to Recreate This Look: Cut rectangular label pieces from coordinating cotton fabrics in the classroom color palette approximately ten by seven centimeters each. Back each fabric rectangle with a stiff fusible interfacing for structure. Apply iron-on letters or hand-stitch the bin label text to each fabric piece. Reading Bin. Maths Supplies. Art Materials. Spare Paper. Finished Work. Library Books. Make enough labels for every bin and basket in the classroom storage system. Attach each finished fabric label to its bin using a small safety pin through the bin fabric or basket weave, a small clip with a hole through which a short ribbon attaches the label, or a loop of ribbon sewn to the label back that hooks over the bin handle.
Decor Pairings: Pair with matching fabric bin label sets made as take-home versions for every student’s home reading folder or homework bag so the classroom and the home learning space share the same consistent, handcrafted label aesthetic and the DIY fabric label system creates a genuine visual connection between the classroom environment and the home learning environment.
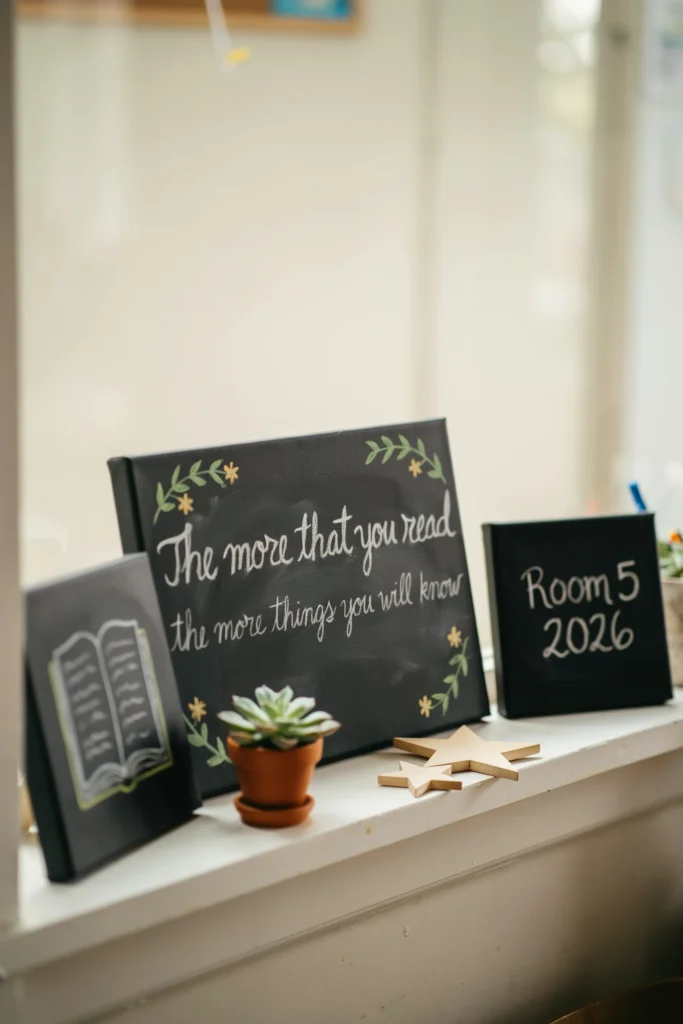
15. DIY Chalkboard Quote Canvas Display
A DIY chalkboard quote canvas made from a stretched canvas painted with chalkboard paint creates one of the most versatile, the most enduringly beautiful, and the most personally expressive DIY back to school classroom wall art pieces available. The canvas can be repainted at the start of every unit with a new relevant quote.
How to Recreate This Look: Purchase a medium-sized stretched canvas approximately forty by thirty centimeters. Apply three coats of black chalkboard paint to the canvas surface allowing each coat to dry fully between applications. Season the cured chalkboard canvas surface before the first design. Apply the chosen back to school quote using white and yellow chalk pens for maximum contrast and legibility. Effective opening quotes include The more that you read the more things you will know, It always seems impossible until it’s done, and Education is not the filling of a pail but the lighting of a fire. Add illustrated chalk border details around the quote text. Botanical elements, stars, bunting, or geometric frames. Lean the finished canvas on a classroom shelf or mount on the wall.
Decor Pairings: Pair with two coordinating DIY canvas artworks flanking the quote canvas on the same shelf or wall. One with a simple chalk-drawn illustration relevant to the classroom theme and one with the class name and year in large simple lettering so the chalkboard quote canvas is the text-dominant center panel of a three-canvas classroom wall art installation.
Bottom Line
A classroom decorated with handmade objects is a classroom that tells a story. The story of the person who made these things. Who spent their own hours cutting and painting and lettering and arranging because they believed that this space and these children deserved that investment. Every DIY decoration on this list was chosen because it tells that story clearly and beautifully. Choose the projects that suit your skill level, your time, and your classroom vision. Make them imperfectly and make them with genuine care. And know that the imperfections in every hand-cut edge and every slightly uneven brushstroke are not flaws in the decoration. They are the signature of the person who made it and the most important thing any classroom decoration can communicate.